Tuesday, December 9, 2014

Used Polaroid 190


Used Polaroid 190                                                                    SOLD!              $750.00

A Polaroid 190 has made its way into our consignment department. The 190 is one of the most coveted Land cameras out there because of its 114mm f3.8 Tominon lens. It uses peel apart 3 1/4 x 4 1/4 instant film, either Fuji or if your lucky enough to have some expired Polaroid, that too.

The Land 190 has a Zeiss viewfinder / rangefinder combination making it easier than other Land models to focus.

The consignee of this item says he was offered this camera by a contact at Polaroid when they were being discontinued, so he took them up on their offer. This might account for the fact that the camera body says '190 Land camera' on it but the outer case says '195' on it. It comes with a strap, Polaroid filter case, close up kit and a lovely hard case to carry it all in.

Nicole has her own Polaroid 195 Land camera and she says it has made a significant difference in her instant photography. It not only allows for a lot more control and far less waste but it has just made the entire experience of shooting peel apart instant film more enjoyable.

Monday, December 8, 2014

Red Light in a Dark Room - Part 2

Below is the second installment of our dark room spotlight. We were curious as to what kind of home darkrooms people have set up and what they are using to process their film and in some cases even print too! In Part Two of our series, we talked to Jesse. Thanks a lot for your input, Jesse, it's great to learn a bit more about different developers and hear about alternative processes people are doing (or have done as the case may be!)


What is your darkroom? A room, closet or bathroom? Please tell us a bit about it.

For simple developing, for now my 'darkroom' consists of a bathroom/closet combination. Film is loaded onto reels in the closet and processed in the bathtub. This is how I develop 35mm, 120, 4x5 and motion picture film. As I take baths in the same vessel (not at the same time), I prefer to stick to developing only and any further processing is completed off-site.

For printing I'm a member of Cineworks and use their fantastic facility, The Annex. Cineworks’ focus is preserving the art and science of cine film, but they also have a tray line, developing tanks, enlargers and of course 8mm and 16mm processing tanks for cinephiles. I just turn up with chemistry and paper. It's an invaluable resource.

What's your process? Tell us a bit about your developing routine, especially if it's tricky.

It’s all tanks. With sheet film, I use a jobo tank with MOD-45 and constant agitation. For 120 film, standard 120 reels in a tank. For these I use intermittent agitation or semi-stand development, agitating only every 4 to 30 minutes depending on the dilution. Recently, I started processing my own motion picture film; for this I have a Russian Lomo tank that can process up to 100ft at a time. I am currently testing film/developer combinations for this setup.


What is your go to developer?

My preferred developers are high dilution pyrogallol and pyrocatechin formulations. They’re economical and give fantastic results. But which one really depends on the subject and the camera format. For years, my go-to was Gordon Hutching's PMK; I was shooting 4x5 and 8x10 sheet film and tray developing with constant agitation. This method gave me great results. But recently I’ve been shooting much more 120; with the smaller gauge, the need for higher acutance and experimentation with high value placement has opened a new avenue to semi-stand development. But in PMK you risk uneven development with semi-stand. This was part of the motivation to move to Sandy King's Pyrocat-HD, which has become my new go-to while I learn it’s capabilities. I've been moving more and more to higher dilution/longer development times, so I'll use up to 1:1:300 with 60min semi-stand development. This has given me great results, but I'm still refining, testing and experimenting with this combination.

What's your all time favorite Film/Film developer combo?

Again, for years my favourite combination for landscapes was Kodak T-Max400 rated at ISO200 with PMK. Recently, I've been more focused on documentary style photography and for this my new favourite is Ilford Delta-3200 rated at ISO800 with Pyrocat-HD. Interestingly, during this new phase I learned the hard way that Ilford Delta films don’t intensify very well with sub-proportional intensifiers. I like the flexibility that sub-proportional intensifiers provide when shooting very low light, so I may go back to T-Max400 yet... I need to do some more testing!

What result/look does this give?

Pyrogallol and pyrocatechin are both staining developers, so in both cases, you can achieve two things... Superb acutance that really give a three dimensional quality to the prints and a beautiful staining action that masks grain and adds density. The stain itself diffuses into the space between silver grains; the makes clouds and fog silky smooth, smoothing out areas that might otherwise show more grain.

Have you or are you into any alternative processes, such as cyanotype?

I love alternative processes; there’s something magical about the process of making your own light sensitive materials and creating permanent photographs from scratch. My senior year portfolio was actually a series of 16"x20" cyanotype landscapes. I was drawn to cyanotype because it is so widespread, so common; people take it for granted. But the process, even the traditional formula, is capable of some absolutely stunning imagery and beautiful, subtle tones. For my portfolio, I shot the original negatives on 8"x10" film, from which I made full exhibition quality 16"x20" FB prints. From these I created a 16"x20" internegative using lith film which I used to print the cyanotypes.  

I also spent several years making daguerreotypes. The original practitioners used to call them ‘a mirror with a memory’. If you haven’t had the experience of holding and viewing one in the flesh, you’re in for a treat. Optically, they’re different from every other photo process ever made, relying on the reflection of light rather than absorption. With a well made daguerreotype in the right lighting, the subject appears to float in space. I made my own plates and constructed a portable darkroom and fume extraction unit that fit into a rooftop box on my Volkswagen Golf. 

Perhaps not quite alternative, while Kodak Aerochrome 2443 colour infrared film was still in production, I would buy 10-20 meters of 9.5” short ends from aerial photographers at a time. In the darkroom, I cut them into 4"x5" and 8"x10" sheets and used them in my 8"x10" camera. I wasn’t happy with the contrast of standard cross-processing (as a colour negative), so I created my own custom AR-5/E-6/C-41/C-22 hybrid process. This required hand processing colour films in trays in complete darkness for over 1 hour at a time. But it made some fascinating imagery, helped demystify colour processing and once I made my first print from an 8x10 colour neg, I was hooked.

I haven't done any alternative processes for a while, but I took a series of images back in 2004 that I've been waiting to print, I just hadn't found the right medium. By chance I recently encountered some opportunities and so have started working on printing them in a particular iron-based process, but I don’t want to release details… yet. But I'll let you know when they're done!

What is the best processing tip you can give?


I have a few:

1. Know your materials. Always test!

2. Spend the time to understand how processing actually works.

3. Don’t fear the chemistry: respect it. Understand what the constituent chemicals actually do!

 And the most important of all: Have fun! Never lose your curiosity.


Saturday, December 6, 2014

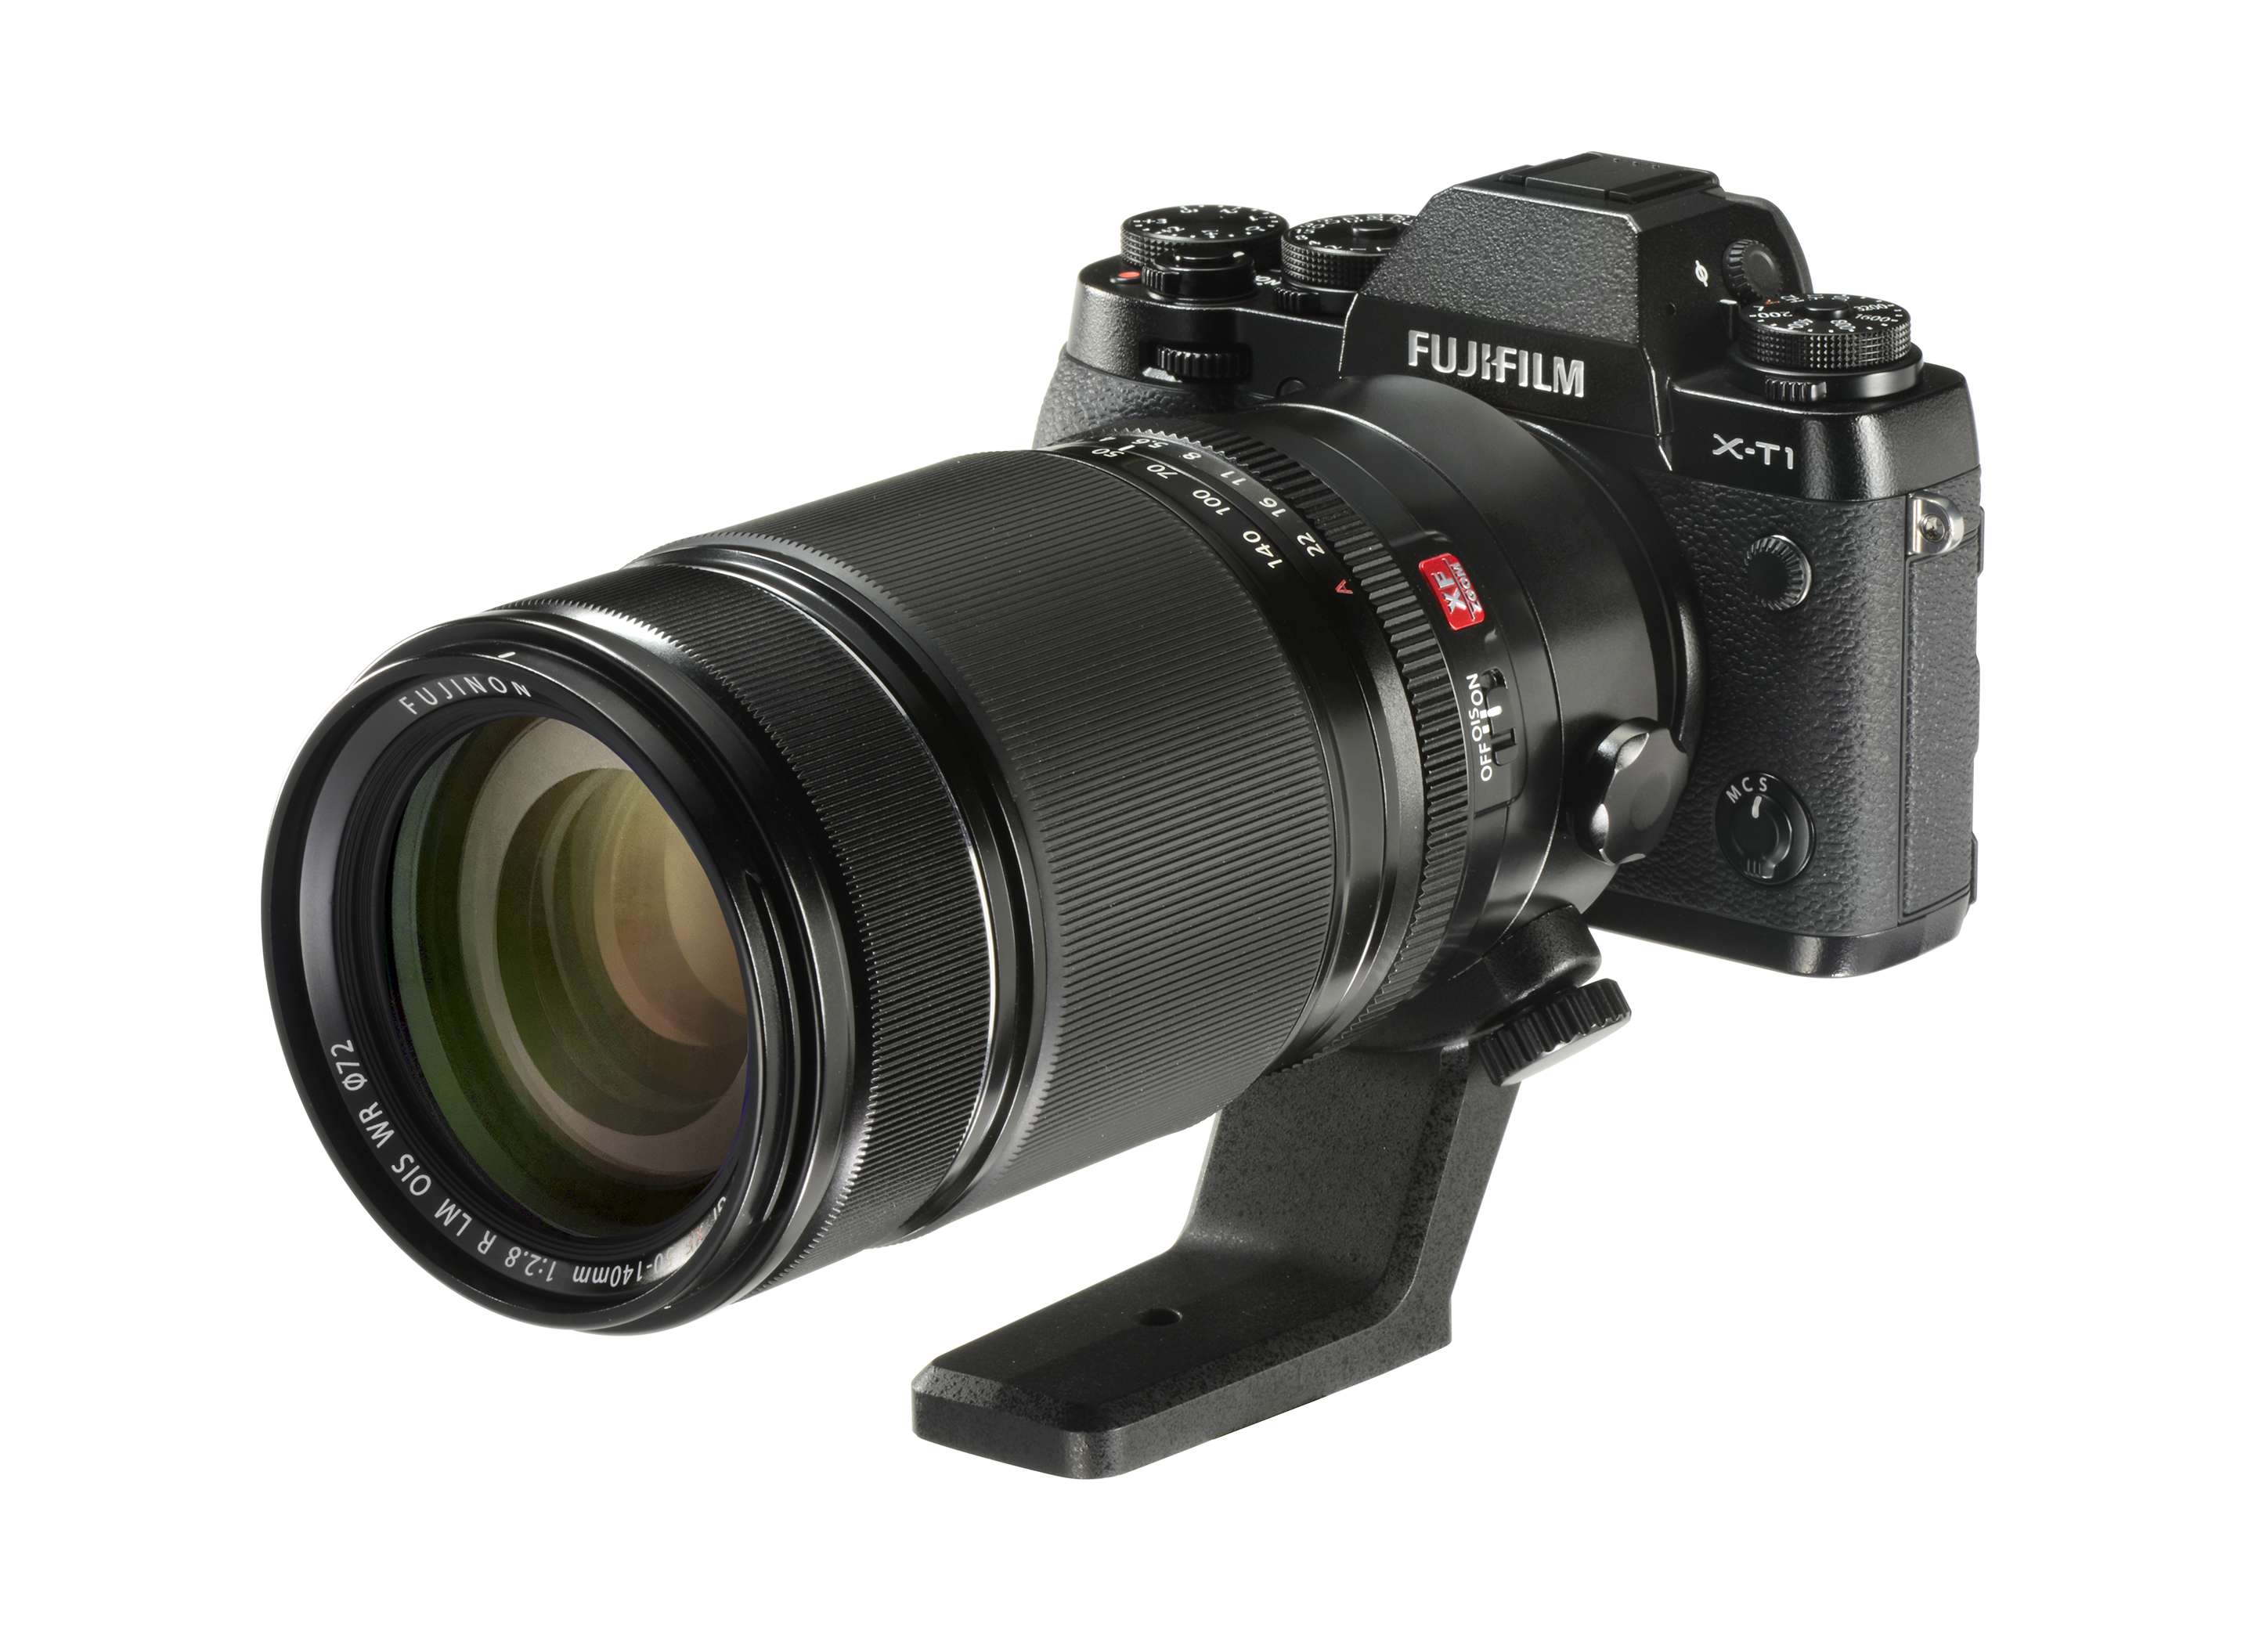
Preview: Fujifilm XF 50-140mm f/2.8R LM OIS WR Zoom


(click on above image to open a high-res version in a new window)

[UPDATE: for my final review with a more extensive image gallery, click this link]

I recently had an opportunity to briefly test Fujifilm's new professional level zoom, equivalent to a 75-210mm in full-frame terms. I tested it on my X-E2 body but above, you can see it mounted to an X-T1. While the lens is indeed quite large and has substantial mass, it is actually not as heavy as it looks, in other words, its density doesn't seem all that high, a welcome fact thankfully. I have Fujifilm's extra hand-grip on my X-E2 and with it, I found the lens fairly well balanced and easy to handhold.

This is constant aperture f/2.8 zoom with a properly marked aperture ring on the lens, a first for Fujifilm zooms and hopefully the beginning of a future trend! It has a linear-motor (LM) for fast and quiet focusing, it boasts weather-resistant (WR) construction and has an optical image stabilizer (OIS) that is rated for 5-stops of extra stability. The tripod mount is detachable with two thumbscrews but it is also a nice way to carry the lens with attached body, to avoid stress on the body's lens mount from the relatively heavy lens.

The lens is beautifully constructed with a fully internal zoom mechanism and a silky smooth zoom ring with absolutely consistent tension that doesn't get tight anywhere within its range or towards either end of the zoom. In addition, it has a perfect feeling aperture ring with nice, crisp detents and excellent tension. In terms of its mechanical operation, it may just be the nicest feeling lens so far for Fujifilm's X-system. Personally, I take great pleasure in the mechanical and tactile feel of a camera's controls, one of the attractions of Fujifilm's X-system for me, and this lens absolutely does not disappoint. Finally, even the lens hood is thoughtfully designed, with a small slide-out portal that allows one to adjust a polarizing filter when the hood is mounted.

Friday, December 5, 2014

Film Spotlight - 3200 iso Black & White


3200 Black & White Film

Nicole & I both really love shooting 3200 iso black and white film. Nicole has shot quite alot with the Ilford Delta 3200 film, and I have used the Kodak TMZ 3200 more. It's our go to film for low light shots when you don't want to or can't use a flash. I don't mind a bit of grain when it comes to black and white film and as you'd expect in a 3200 iso rated film, there's a bit of grain to either of these films. However it's not as crazy as you might think and the beauty of black and white film is that you can really develop it and print it how you like it. It's fun and easy to manipulate most of the time. I have found that the Kodak TMZ has quite a bit more contrast and when printing my own photos I usually went with a really high contrast look, with deep blacks and hard highlights. I always loved shooting bands in a dark, smoky bar with the Kodak TMZ. The Delta 3200 seems to show a bit more highlight detail in high-contrast shots and it still manages to keep good detail in faces under bright stage lights. You generally are never allowed to shoot bands with flash photography. When I was a student and lover of crazy celtic bands, I loved the non-invasive tactics of shooting film with no flash and spent most of my 4 years in Art School extensively photographing my friends' band in every pub in Winnipeg. It was a great time to learn to play around with it, when I could get up close and personal and the guys were not up on a high stage. Nicole played around with the Delta in much the same way, also shooting bands and night club shows. We have both found that when shooting in this type of situation you really have to be careful to still not shoot this film wide open, as you may be tempted to do, because it then becomes very difficult to hold focus within the shallow depth of field.

Here are just a couple of shots Nicole and I have taken with each of these films under similar lighting situations.


Nicole's shot of David Usher; Delta 3200.


Meghan's shot of Men in Kilts; Kodak TMZ 3200. This is two shots together actually...


These days we don't shoot much in the way of band photography, but Nicole & I both still love using 3200 for night scenes of a different artistic value. Parties that include crazy costumes, street scenes, or interesting photo shoots that we create ourselves. The versatility of these films makes it so easy and fun for action, because you don't have to think as much about the situation and you can easily capture a moment as it happens. Though we don't often shoot 3200 with a flash, you definitely can! In situations where your subject matter may be moving fairly fast, a flash is a good option so you don't have to shoot wide open and allow for a larger depth of field.

Nicole's shot from the Parade of Lost Souls 2014. Delta 3200.


When developing 3200 film, in particular the Delta, we have found that Blazinal does not work the best. It seems to really bring out the grain in the film even more and creates a fairly thin negative. Kodak Xtol seems to work much better.

Unfortunately, Kodak has now discontinued the 3200 TMZ film. However you can still find stock of it around and we currently have some in the store.

If you have any photos you've shot on 3200 iso film, we'd love to see them! The best way to share with us is on twitter and you can tag us @beauphotostore so we can see your work. Stay tuned for more film blogs, as Nicole and I will continue to shoot different films to review and compare.


Monday, December 1, 2014

Red light in a Dark Room - Part 1


It seems like more and more people are doing their own home film developing these days and so we were curious how some of our customers had their darkrooms set up. We've decided to make it into a regular blog series to showcase a wide variety of darkrooms. In addition to wondering how people set up their dark rooms (and where!) we wanted to know more about what chemistry combinations they use to get the results they enjoy or the various effects different developers have on different films.

Nicole has put together a short interview style questionnaire for our willing participants and here is our first installment from a regular customer of ours, John Brunstein. He's also kindly included some sample images that he's developed. Thanks so much for your contribution, John!


What is your darkroom? A room, closet or bathroom? Tell us a bit about it.

Strictly speaking, I don't have a darkroom - I have a changing bag which I use on my dining table to load exposed film into the developing reels and then into their tank (Jobo 1500 series, Patterson, Yankee Clipper II, or Minox depending on the film and process). I also find it ok for loading 35mm bulk spools into a bulk film daylight loader. Then, I do my actual developing in one of my bathrooms, which has windows and isn't dark at all.

For the Minox, Yankee Clipper II (110 film) or B&W in the Patterson tanks, I do the actual developing just at the bathroom sink and hang the film to dry in the tub. For E-6 or C-41 processing, I have a Jobo CPE2 with a lift kit. (That's not super big tires; it's a lever which enables you to dump the tank contents easily during the process). I have the Jobo system set up on a couple of sheets of plywood cut to fit nicely over the tub in that bathroom, with a big Nalgene container sitting in the tub with the Jobo waste line running into it, so it neatly collects all the chemicals.

If I have guests coming who might want the bathroom for its intended use as the ensuite to my guest bedroom / office, everything can be lifted out and stored away in maybe 15 minutes.

The reason I can get away with no additional darkroom space, is that post -developing I go digital. I scan the negatives on an Epson V500 (I have commercial grade holders for Minox, 110, 127, as well as 35mm and 6cm wide medium format film). Post digitizing, I print via inkjet (HP machines, I have the 8150 which does up to 8.5x11" and the 8750 which can do 13x19", and can have the greyscale and photo colour cartridges installed at the same time).

The point for me was explicitly that my house wasn't well set up to have a traditional darkroom - but this hybrid approach lets me shoot and develop film, and have total control over the digitizing, retouching, and printing, without one!

What's your process? Tell us a bit about your developing routine, especially if it's tricky.

All of my developing is pretty straightforward. For B&W hand tanks, I invert 5x at the developer fill point, then 5x every 30 sec or 120 sec depending on the film - I experiment a bit to find what works for me in terms of time. I use distilled water (I have my own still) but everything is just room temperature, and I just use my phone as a timer. Maybe because I try a range of times before finding what I like, once I have something that works for me, I stick to it and don't experiment much with other developers. For E-6 I like the Arista kits - in my hands they're literally close to foolproof, I could prove that but the story is too long for here - and for C-41 I've only tried the Tetenal liquid kit, which seemed to work fine. Honestly, given the choice of E-6 or C-41 at home, since I digitize post developing, there's not much point in C-41.


What's your go to developer?

For B&W, Ilfosol 3. As I said above, once I got it to work well for me, I didn't see much point in experimenting. However it has a short shelf life after opening so I've recently acquired a bunch of HC-110, which is supposed to have a better shelf life, and I'll give it a try.


What's your all time favorite Film/Film developer combo?

Do I have to have only one? For B&W it would probably be Kodak Tech Pan with Ilfosol 3. Yeah, I know, Tech Pan isn't made any more, but I was lucky and got a whole lot of it in 120 format, freezer stored. Expired in 1988 and still takes beautiful, crisp shots without any time adjustment. In 35mm I would also have to say I've been very impressed with some of what I have gotten with Ultrafine Xtreme 100 with Ilfosol 3.

What result/look does this give?

The Tech Pan is just super fine grain, with a very wide tonal range. (TechPan 047 attached; shot with Rolleiflex 6008i with 80mm Planar lens). The Ultrafine gives great moody shots with a 1930's feel, or maybe that's just my subjects (2014-11-03 attached; shot with a 1956 Kodak Retina IIIc on the 50mm lens).


Have you or are you into any alternative processes, such as cyanotype?

Not yet. I would like to try a tintype plate in an 1899 Rochester Cycle Poco camera I have on the shelf, but haven't gotten around to it yet.


What is the best processing tip you can give?

If you're going to use a changing bag, and try to work with medium format film - WEAR LAB GLOVES! If you don't, the humidity from your skin in the tiny space of the bag quickly makes the wide film sections jam up in the spools, and it's a disaster. Wear the gloves instead and make sure the spools are absolutely dry, and the process is really simple - even loading 2, 120 formats onto a single spool without jams.


Here are the two examples John mentioned above...


TechPan, shot with Rolleiflex 6008i with 80mm Planar lens.


Ultrafine, shot with a 1956 Kodak Retina IIIc with 50mm lens.


Wednesday, November 26, 2014

Lindsay Adler Behind the Scenes Video

Check out this great behind-the-scenes video of the Lindsay Adler workshop in Vancouver back on the October 17th weekend. Hugh Tull did an amazing job organizing the event and he even found time to make the BTS video of it!

Friday, November 21, 2014

NEW! Fujifilm X-T1 GS, X100T and more...


Finally after a long wait, some hotly anticipated new Fujifilm cameras are in stock! First off, we have the lovely new X-T1 Graphite-Silver Edition, seen above. Then, the new X100T bodies have come in as well…

Note that as of this blog entry posting, we still have one beautiful silver X100S remaining in stock at a reduced price!

Also, Fujifilm has announced a set of macro extension tubes for the X-system - way cool! They are fully coupled electronically with the X-system lenses and should be available some time in December for roughly $100-$110 each…


Despite the fact that it is not mentioned in Fujifilm's press release, nor shown on their lens compatibility chart, I have confirmed that you should be able to stack these tubes with, for example, the XF 60mm f/2.4R macro lens to get close to 1:1 magnification - by itself without tubes the 60mm only gives 1:2, so half life-size. For many lenses, stacking both tubes will likely be too much though. For example, on the XF 18-55mm zoom, using MCEX-16 by itself already results in a nearly unusable 4mm working distance at 18mm! However at 55mm, the working distance becomes a more manageable 63mm. If you were to try using both tubes, the point of focus would actually be behind the front element of the lens at 18mm although when you zoom towards 55mm, at some point I suspect the stacked pair would become useable again. For a PDF chart showing specifications for the individual converters when mounted on the current X-series lenses, see the following link…

Magnification of the Macro Extension Tube (PDF: 90KB)

Lastly, Fujifilm has released details on the upcoming firmware updates for their X-series bodies. The black X-T1 will get an especially comprehensive list of updates! Here are links to Fujifilm's info on the upcoming firmware (as well as the extension tube announcement)…

Fujifilm Announces Macro Tubes and Details of Upcoming Firmware Updates

Friday, November 7, 2014

Lomography Photo Contest 2014!


Beau Photo Supplies is having a Lomography Photo Contest! We want you to go out and take photos with your Lomography camera or send in ones you've already taken.

 
You could be the lucky winner of a brand new Diana camera! Photo entries are free but limited to 5 photos per customer, and must have been taken on a Lomography brand camera. Contest is open Internationally. Photos should be printed in 4x6 or 5x5 format or standard panoramic size. Please don't hesitate to contact the film department if you have any questions regarding this! Email Nicole: film@beauphoto.com

 
The contest will be open for submissions from Now until 5pm December 22th, 2014. Submissions will be judged by a panel on December 24th, 2014. This year Beau Photo will be open December 29th , 30th till 5:00pm and December 31st till noon, so feel free to come by and view all the photos entered and have a peruse of our boxing week sales. However, if you can't make it by during the holidays, the photos will be on display until January 31st.

 
The Grand Prize winner will receive a Diana camera donated by Lomography NYC. The Runner Up will receive Lomography film. We are excited to see your images!

 
To submit, please drop off or mail your prints to the store with your name, phone number, email address and type of camera used printed on the back of each photo. If you have trouble getting into the store to drop off submissions during our regular
8:30 – 5pm, for the month of December we are open till 7pm on Fridays plus our usual 7pm Thursdays.

 
If you would like to have your photos mailed back to you please include a self addressed stamped envelope with your submission. We will not be held responsible for any accidental damage to the photos we receive as they will be up in our entrance way for all to view, so please do not send any originals.

Our mailing address is:

Beau Photo Supplies
1520 W 6th. Ave
Vancouver, BC
V6J 1R2

If you are not familiar with the Lomography series of cameras, here's a fairly comprehensive list of them all and a few samples. If you don't already own a Lomo camera or want to buy another one to try out, we have quite the range in store!

One of their really fun cameras because you actually build it yourself is the Konstructor!


 Here's a sample of a photo from the Konstructor.


The next series of cameras are the LC-A, LC-A 120 and the LC-A Wide.
 
Here's a look at the LC-A Wide...
 
 
And a sample from the LC-A Wide.


There's also the Lubitel, the Lomokino and the Sprocket Rocket.

One of their really sharp, great cameras that is extra versatile because it does a variety of sizes is the BelAir.


It can do 6x12...


And 6x6....


6x9 size...


As well as regular 35mm in a long format...


Lomography also has their great range of Diana cameras. From the baby (110 film) to the mini (35mm film) to the standard F+ (120mm film.)

We love the Diana F+! Especially with its varieties of colors!


Can you tell we also love animals?


Another one of their cameras that comes in quite the variety of colors is the La Sardina. Which is aptly named, as it's based on a camera made from a sardine can! Takes fun photos too.


If it's that sweet Fisheye look you're into, then they've got those too! There's the Fisheye 1 and 2, plus the Fisheye Baby 110! The baby is pretty cute, but takes some serious photos.


Lomography also has quite the range of sampler and splash cameras. There's the SuperSampler, the Action Sampler, the Oktomat and the POP 9. Which all take multiple images at once, giving you a great idea of motion. There's also the ColorSplash, that comes with colorful gels you can put over the flash to give you a burst of color in your photos!

Here's the ColorSplash.


And lastly, if you want to get the whole picture....there's some very interesting and creative panoramic cameras in the Lomo line up. There's the Spinner 360 that will actually spin around and get a whole view and the Horizon which has a swing lens to get a great 180 degree view.

Here's the Horizon Kompakt.


It takes fantastic panoramics!


If you have any more questions or would like to inquire which cameras we have in stock give us a call or send us an email! We also carry a variety of Lomography film too!


Thursday, October 2, 2014

Shane Hurlbut Illumination Tour coming to Vancouver

If you ever wanted to learn about lighting for film or video, this is the workshop for you. Everyone who comes to this workshop is going to come away with a greater understanding of Cinematic lighting. Even photographers and stills photographers will learn a lot from Shane's workshop. Sign up soon and use discount code IETBEAU and save some $$. Click on the poster for more information and to register.  To see a behind the scenes view go to;  https://vimeo.com/107627879


Wednesday, September 24, 2014

Scott Secco speaking at FUSION 2014


For those who are interested in mountain bike action film-making or just love watching mountain bike films, you should come hear Scott Secco at Fusion 2014. Scott is an action sports filmmaker from Victoria and his talk will cover his own introduction to film-making, the summer he worked as an intern for Sherpas Cinema during the editing of ‘’Into the Mind,’’ and his transition from shooting web videos to working on his first feature film: ‘’Builder.’’ From athlete injury in the Chilean Andes, to the joys of hyperlapsing, this talk will cover the ins and outs of action sport film-making. Over the years he’s mastered the art of riding a mountain bike down sketchy trails with far too much camera gear strapped to his back – a handy skill for an action film-maker.  For more information about FUSION 2014 and tickets go to: http://www.photographiefestival.ca/event-schedule/fusion-2014/