Monday, April 20, 2015

Red Light in a Dark Room - Part 18

We're back this week with a new installment of our dark room series from Ron. Sounds like a good set up and a reoccurring theme in the advice column definitely seems to be STAY ORGANIZED and be meticulous about recording what you do. Thanks, Ron!

What is your darkroom? A room, closet or bathroom? Please tell us a bit about it.

When it comes to developing film I use my whole house. The Laundry room (loading reels), the Main Bathroom (for drying the film) and the Kitchen (for mixing the chemicals and "souping" the film).

My darkroom does double duty as a laundry room. It works well since it has no windows and I've set a curtain before the door so no light sneaks through from the outer hall. The top of the washer and dryer make a good large workspace. I haven't expanded into printmaking yet. (I have an enlarger and all the accessories, but I need to build a proper darkroom before I can use them.)

What's your process? Tell us a bit about your developing routine, especially if it's tricky.

I like to keep my process as simple as possible. I use two 2-reel Paterson tanks which I load in the darkness of the laundry room.

Before loading I check Massive Dev chart (http://www.digitaltruth.com/devchart.php) to ensure that the films I am developing have the same development times (not a concern for colour but important when developing black and white)

I make a note of each roll and its position in which tank.
ie. tank 1 - Top: HP5 - Olympus OM 10 - March 5 - Gastown

Bottom: HP5 - Canon QL17 - Feb 3 - Strathcona

I often check filmdev.org to see what other people are doing; but, for the most part, I like to stick to the tried and true methods found on the Massive dev chart website.

I don't do stand developing, not because I don't like it but because I haven't the patience to sit around waiting :) My general rule of thumb is agitate for the first 30 seconds and then 4 or 5 inversions every minute after that.

Sometimes I will pick up Ilfostop, but if I run out I do a water stop for two minutes (30 seconds agitation/empty/refill and repeat)

I use Ilford Rapid fix as my go to fixer and, even though it says three minutes is adequate, I like to fix for 6 - 7 minutes using the same agitation as in developing. I've read that it is difficult to over fix and I haven't yet.

Once the film is developed, I hang dry it in the main bathroom (I run the shower for about 15 minutes before hand to keep any dust from ending up on the film as it dries)

Once dry I scan it to my computer with an Epson V550 scanner and store the negatives in archival sheets and binders.
What is your go to developer?

I like Ilfosol 3 because it's low maintenance. I can mix it and go. Unlike a powder mixes like D76 where I have to mix it ahead of time and let it cool.

What is your all time favorite Film/Film developer combo?

I can't give an opinion on this as I haven't been doing this long enough to have experimented with different combinations. I often use whatever I have in the house. Currently I have enough Ilfolsol 3 for two more rolls and a liter of D76 mixed/ready to go. I just picked up 3 - 5L mixes of Xtol and am excited to give it a try.

What result/look does this give?

I will say this... When I've developed HP5 in Ilfosol 3, I've found the results to be grainy with a nice contrast; however, Ilfosol3 with Tmax 400 ended up with a nicer grain and less contrast. Now, take it all with a grain of salt since, like I said, I haven't got the years of experience that many, more knowledgeable, folks may have.

Have you tried any or are you into any alternative processes, such as cyanotype?

I haven't done anything like cyanotype, but I have had great fun playing with caffinol. If you're unfamiliar... Caffinol is a process in which you create your own developer using instant coffee, vitamin C, and washing soda. (It smells as revolting as it sounds) A great video can be seen at https://www.youtube.com/watch?v=zYjOqcbBEco and many different recipes and guides can be found at http://www.caffenol.org/

What is the best processing tip you can give?

1) Leave your phone, smart watch etc outside the darkroom! I learned this lesson a couple days ago when I forgot to take off my watch and, half way through loading some 120 film on a reel, it lit up.

2) Invest in a film puller - makes life soooooo much easier.

3) Set everything up the same way every time. Its so much easier to find the reel, scissors, film rolls etc... when you put them in the same place.

4) Label your film - often it will be weeks or months before you process some rolls (Gary Winogrand would let his film sit for a year) and it sucks trying to archive your stuff when you can't remember when/where the photo was taken, or what camera/ lens combo was used.

5) Make a note of what film is where in the tank and keep track of where it hangs when drying ( I work top to bottom/left to right - so when hanging the film the top roll in the tank is always on the left and the bottom roll is on the right (tank 1 is left, tank 2 is right.))


Friday, April 17, 2015

Where can you develop film in Vancouver?

Looking for somewhere locally to develop 110, 35mm 120 Black & White & C41 film? Well, the friendly staff at Rocket Repro are here to help! Thanks to Martin for providing us with a little bit of their history and what services they offer.


Most people think about Rocket Reprographics as “The Headshot Place” where actors and headshot photographers get their images printed. While this is certainly true, we do so much more than that, providing services for both professional and amateur photographers.

Rocket Repro began as an exclusively Black and White photo lab in the late 1980’s servicing a small number of professional photo studios. At that time all headshots and much fashion photography was shot and printed in Black and White. In the mid-90’s we took our lab retail with a storefront in Gastown and did Black and White film development and printing to include amateur photographers and enthusiasts as well as our professional clientele. (We even included budding photographer Brian Adams as a client - our Gastown neighbour before moving to London!) The next transition was to color processing and then ultimately to digital. We now provide a full spectrum of imaging services including digital output wide format, fine art prints as well as servicing Actors with headshots Canada wide.

But still, we have not forgotten our roots. We continue to process both Black and White as well as Color negative film, and we print and scan from negatives for both professionals still working in that medium as well as photo enthusiasts revisiting this lost art. We are very excited to see film make its resurgence and truly enjoy being part of this new film revolution. 

ROCKET REPROGRAPHICS INC
403 West Cordova St. Vancouver BC
604.682.6000
www.rocketrepro.com

Thursday, April 9, 2015

Project Impossible V2.0: Photos from the People Gallery Opening

A big thank you to everybody who took part in our Impossible project V2.0: Photos From the People show and everyone who attended our show open last night! It was wonderful to see so many smiling instant film enthusiasts in one place!!


Kathy had the 8x10 camera going for portraits with the Impossible 8x10 film and it was a huge hit! We were overwhelmed by the amount of people who were interested in learning about it. Thank you to everyone who stayed to have their photo taken.


The show is on now at Science World until May 10th, 2015. The photos are hung in the entry way as you go into the main building. Please note that admission fees to Science World now apply to gain entry to the show.

We would like to say a BIG thank you to Science World for all their help with the show! They were very gracious with their time and were very helpful while setting up all the photos and getting us everything we needed to make it all happen.

There were so many creative entries, it was extremely tough to choose a winner. However, after much deliberation our judges finally made their decisions! Here are the Impossible Project V2.0: Photos From the People show winners:

Over All Prize Winner: Ron Jensen's “1 – Two - Me." SX-70.


Impossible Project photo taken with a Polaroid camera: Allison White's “Half Light.” SX-70 Sonar.


Impossible Project photo using an Instant Lab: Clara Edvi's “Prairie Drive”


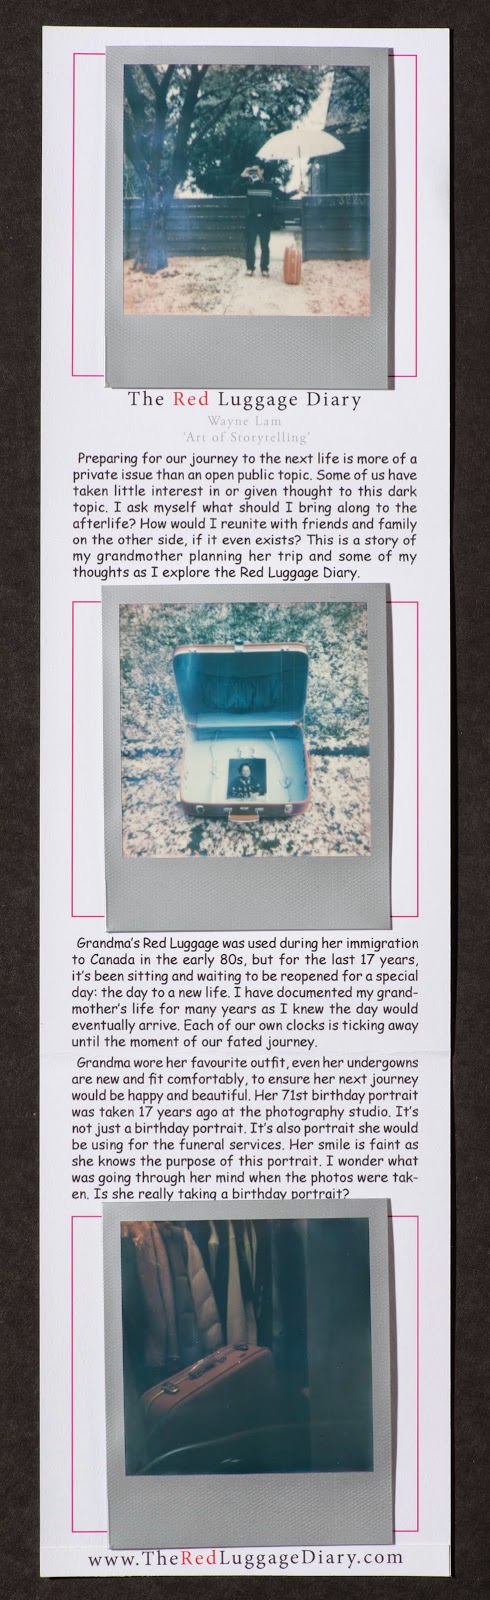
Impossible Project photo mixed media: Wayne Lam's “Red Luggage Diary.” Polaroid 600 Cool Cam.


Judges Choice: Chris Gallagher's “Then Was Once Now.” Polaroid 600.

Jason – “Loved the idea and presentation of the print with the fresh tulip.”


Judges Choice: Tracey Harper's “Catching Rays.” Polaroid SLR 680.

Jane – “This caught my eye & held it. I like the idea that sunlight is out of shot on the left, the straight lines give it focus and I enjoy wondering about the imperfection at the top.”


Judges Choice: Melissa Partee's “Jack Point – Winter 2015.” Polaroid 600.

Kit – “This image has a quietness about it. The framing of the tree brings the viewer to the centre where the eye is met with a bold horizon line.”


Judges Choice: Georgette Swenson's “Bobby.” SX-70.

Jo Ann – “Feels like my favourite summer Sunday afternoon.


Staff Pick: Zoe M. Wright's "People Taste So Good."


Adventures in Chemistry: Darkroom Safety

Our friends over at Cineworks have a great course coming up!
 
ADVENTURES IN CHEMISTRY: DARKROOM SAFETY

19 April 2015—11:00am-1:00pm
Cineworks Annex, 235 Alexander Street

How many of us have ever handled darkroom chemicals without gloves? Or developed a print without tongs? We've all read the warnings on photographic chemicals, but how many of us have always heeded them? To the novice, many of the precautions sound like hyperbole designed to protect the manufacturer rather than inform the photographer. But the warnings are real. Chemicals commonly encountered in the darkroom range from the harmless to violent poisons. It is important for the darkroom enthusiast to understand the hazards faced in the pursuit of art. This class is designed to introduce students to the roles of chemicals in our photographic work, their risks, their benefits the procedures required to use them safely.

$15 Cineworks members; $20 non-members (plus taxes)
Bookings: https://darkroom-safety.eventbrite.ca
http://www.cineworks.ca/attend/event/97

Wednesday, March 25, 2015

NEW IN RENTALS! Canon 11-24mm f4L

NEW! The lens of many a landscape, architecture, real estate, astrophotography or interior photographer's dream has finally arrived! Yes, the new Canon 11-24mm f4L has made its debut in Beau Photo's Rental Department! Incredibly sharp at all focal lengths, and very well corrected, this hefty beast is sure to find its way into many photographer's bags! $45/day or weekend.

Canon 5DmkIII + Canon 11-24mm f4L @ 11mm - 1/4 sec, f16, 100 ISO

Canon 5DmkIII + Canon 11-24mm f4L @ 11mm - 1/30 sec, f4, 800 ISO

Canon 5DmkIII + Canon 11-24mm f4L @ 12mm - 1/60 sec, f5.6, 100 ISO

Tuesday, March 24, 2015

Red Light in a Dark Room - Part 17

This week's wonderfully informative blog post is brought to you by John C. Hollemans. He has also sent in lots of great photos of the creation of this lovely home darkroom. Thanks so much for your thoughtful answers, John!

What is your darkroom? A room, closet or bathroom? Please tell us a bit about it.

The current darkroom built in 2013 is a former “walk-in closet” that was used as a darkroom by the previous owner of our house. It measures 84” x 62” with a 96” high ceiling. It is quite small compared with other darkrooms I have built (5 in total). The photos and layout drawing show what it looks like. Since I am right handed, my workflow is from left to right. The benches are arranged so that I work in a “clockwise” direction starting at the enlarger station. The top surfaces of the benches are quite high, and are 4” below my elbow to be comfortable while standing. I never built a long sink to place development trays in. I use “rolled ends” or fresh newspapers on the bench top instead. The trays sit on this paper and protect the varnished surface from minor spills. Large spills are best avoided and when they do happen must be cleaned up immediately.

What's your process? Tell us a bit about your developing routine, especially if it's tricky.

Since I use black and white materials only at this time, there are two development processes; one for film and one for paper. For film developing I use the Paterson system tanks and reels. The reels accommodate 135 and 120 films very easily. When you use a camera that “counter winds” the film on the pickup spool (many cameras do this to counteract the film curl) it is often necessary to heat the reel with a hair dryer to make sure that it is absolutely dry. A 36 exposure "counter wound” roll will frequently not go all the way into the reel if it is not perfectly dry. The Paterson tanks are very good since they fill quickly and empty quickly. After a film is washed I immerse it clean water with a bit of Photoflo 200, then remove it from the reel and hang it in a tall home made dust free film dryer cabinet. It is best to never touch the film with your fingers or a squeegee. For paper developing I use trays for sizes up to 11” x 14”. They barely fit on the “wet” bench. For 16” x 20” prints I use a drum on an electric drum roller. Washing of large prints is also done in a drum.

What is your go to film developer?

In the past I experimented heavily with various films and developers, and concluded that a one-shot developer was best for me. I use the old Agfa Rodinal developer which is now available again as Blazinal, made in the Toronto area. You can buy it from Beau Photo. I tend to use dilutions of 1:25 or 1:50. As a backup developer I also use a high acutance developer formulated by Willie Beutler. You need to compound this from basic ingredients. It is a one-shot developer as well.

What is your all time favourite film/film developer combo?

I get fine results from Ilford FP4+ (135 type) and Rodinal. Kodak T-Max 100 and Rodinal are also a very good combination. I have recently tested Fuji Neopan Acros 100 (135 type) with Rodinal and like the results.

What result/look does this give?

The Fuji Neopan Acros 100 has a superb tonal scale in both shadow and highlight areas. It has very fine grain. A 16” x 20” enlargement made from an Acros 100 negative is just as “grainless" as one made from an old Agfa 50 ISO film negative.

What is your all time favourite paper/paper developer combo?
I began making prints when I was 16 years old when growing up in The Netherlands. You could only buy graded papers by Agfa and GAF. I preferred Agfa Brovira and made my own developer and fixer from chemicals purchased at a local drugstore. Today I mostly use Ilford’s RC Multigrade IV paper with the modern contrast filters for the enlarger. There are literally dozens of paper developers. The late Ansel Adams preferred Agfa/GAF 130 developer <http://simmonsphotos.com/Formulas/Paper/Agfa130.html>.

I never tried this developer since it contains glycin, an expensive chemical. My standard paper developer is Kodak Dektol or D72 and I have used it for a very long time. It provides a fine neutral black on both fibre and RC based papers. Keeping properties are very good. You can buy this developer in Kodak packages if still available, or you can use an Ilford equivalent. If that fails you can always compound your own from scratch.

Have you tried any or are you into any alternative processes, such as cyanotype?

I have not tried cyanotype process since it requires a large format camera. However, I have made many prints in sepia using a two bath toning process. Years ago I developed my own colour negative and slide films using the C41 and E6 processes. I even made black and white slides from Kodak Panatomic X film with a reversal process. In addition I created small and large colour prints using the EP2 process. Colour film development and printing is normally done at a temperature of 38ºC or 100ºF. So, a thermostatically controlled water bath is needed to maintain processing solutions and development tanks and drums at the correct temperature. This equipment complicates processing of colour materials, while printing on paper requires colour balancing with a colour analyser. You need a fairly large darkroom to accommodate this type of equipment. That is why I now stick to simple black and white techniques.

What is the best processing tip you can give?

There are many tips I could give. The most important tip is that the carrying out of all darkroom processes must be totally consistent and repeatable. In a darkroom we are dealing with processes that require precise dilution of chemicals, exact timing and handling of solutions at specified temperatures. To make sure that you can duplicate a given result in the future you must write down excellent notes while developing film and making prints. You need to make sure that your notes make sense to you years from now. If you experiment, your notes will allow you to analyze the results, and converge faster on the image quality you want. I began writing a logbook in 1974.

What are some general comments?

Instead of a handwritten logbook another possibility is to record your work in a suitable computer database. I have negatives and slides going back over 40 years. Slides are kept in marked plastic boxes and sleeves. Black and white plus colour negatives are stored in good quality #10 envelopes. Each envelope shows date, film type, development, location, subjects and any other useful information. I am still entering the information on the envelopes into a database. You could use an MS Excel sheet, or better still a proper database provided by an office suite such as "zero cost" LibreOffice or OpenOffice. The same idea applies to prints you made and possibly sold to customers. There are some good computer based tools available for professional photographers.

See below for some great photos of the creation of John's darkroom!


Used Desisti Fresnel Spot for Speedotron


Used Desisti Fresnel spot for Speedotron. 4800 W/S  Max. Comes with Head extension cable and pigtail adapter to work with  both Black and Brown lines from Speedotron.  Very good condition.
Tag #2094                                                                                          $1200.00 SOLD

Monday, March 23, 2015

Used Hasselblad H 1.7X Tele Converter


Used Hasselblad H 1.7X tele converter. Very good condition.
Tag #2109                                                           $1085.00 SOLD

Used Hasselblad H 13mm and H 26mm Extension Tubes


Used Hasselblad H 13mm extension tube. Very good condition.
Tag #2110                                                                  $235.00 SOLD

Used Hasselblad H 26mm extension tube. Very good condition.
Tag #2111                                                                  $240.00 SOLD

Friday, March 20, 2015

My first Impossible Project

This week Pauline was at Beau Photo and had the chance to job shadow various staff members....so she wrote a great blog post for us too! See her blog post below. Thanks, Pauline!
------
Thanks to the work experience program offered at my school, Crofton House, I had the chance to work at Beau Photo Supplies and use a Polaroid camera. I took instant photos for Beau Photo's Project Impossible contest, which anyone can enter and showcase their photos at Science World. Submissions will be taken until Monday, March 30th. Not only can you showcase your images in the exhibition, there are also many prizes to be won! You can visit film@beauphoto.com or www.beauphoto.com/impossible15 for more details.

Having been exposed to only digital cameras before, taking pictures with the Polaroid camera was a new experience for me. It was hard to get used to it at first, but after taking several shots of the scenery I immediately fell in love with the instant Polaroid camera. The Polaroid camera produces beautiful images on the film and holding them in my hand made me appreciate the beauty of the pictures more than I would for digital pictures. The photos end up with a kind of dreamy or surreal look. Even if the camera might be hard to use and the film might be expensive, the end results of the photos are worth it.