We have another installment for our darkroom series, this time from David. Thanks a lot for contributing, David!
What is your darkroom? A room, closet or bathroom? Please tell us a bit about it.
It is a storage room, no running water, very dark with overall constant temperature. Small space.
What is your process? Tell us a bit about your developing routine, especially if it's tricky!
Stainless steel Kindermann tanks. Agitate 1st minute continuously, then 5 seconds per minute up to 10 minutes, then 10 seconds per 2 minutes after 10 minutes.
What is your go to developer?
AGFA Rodinal or Kodak HC-110.
What is your all time favorite film/developer combo?
AGFA APX 100, Rodinal. 1:50 68F/20C.
What kind of look does this give you?
Crisp.
Have you tried any or are you interested in any alternative processes, such as cynotype?
Palladium, salted silver. (1986)
What is the best processing tip you can give?
Cleanliness, constant temperature, correct times, patience.

The blogs of Beau Photo Supplies Inc., Vancouver's professional camera sales and rentals store.
web> www.beauphoto.com talk> 604-734-7771 where> 1520 W. 6th Ave., Vancouver, B.C. when> M-F 8:30am-5pm & Thurs to 7pm!
Showing posts with label Darkroom. Show all posts
Showing posts with label Darkroom. Show all posts
Thursday, July 16, 2015

Monday, April 20, 2015
Red Light in a Dark Room - Part 18
We're back this week with a new installment of our dark room series from Ron. Sounds like a good set up and a reoccurring theme in the advice column definitely seems to be STAY ORGANIZED and be meticulous about recording what you do. Thanks, Ron!
 What is your darkroom? A room, closet or bathroom? Please tell us a bit about it.
When it comes to developing film I use my whole house. The Laundry room (loading reels), the Main Bathroom (for drying the film) and the Kitchen (for mixing the chemicals and "souping" the film).
My darkroom does double duty as a laundry room. It works well since it has no windows and I've set a curtain before the door so no light sneaks through from the outer hall. The top of the washer and dryer make a good large workspace. I haven't expanded into printmaking yet. (I have an enlarger and all the accessories, but I need to build a proper darkroom before I can use them.)
What's your process? Tell us a bit about your developing routine, especially if it's tricky.
 I like to keep my process as simple as possible. I use two 2-reel Paterson tanks which I load in the darkness of the laundry room.
Before loading I check Massive Dev chart (http://www.digitaltruth.com/devchart.php) to ensure that the films I am developing have the same development times (not a concern for colour but important when developing black and white)
I make a note of each roll and its position in which tank.
ie. tank 1 - Top: HP5 - Olympus OM 10 - March 5 - Gastown
Bottom: HP5 - Canon QL17 - Feb 3 - Strathcona
I often check filmdev.org to see what other people are doing; but, for the most part, I like to stick to the tried and true methods found on the Massive dev chart website.
I don't do stand developing, not because I don't like it but because I haven't the patience to sit around waiting :) My general rule of thumb is agitate for the first 30 seconds and then 4 or 5 inversions every minute after that.
Sometimes I will pick up Ilfostop, but if I run out I do a water stop for two minutes (30 seconds agitation/empty/refill and repeat)
I use Ilford Rapid fix as my go to fixer and, even though it says three minutes is adequate, I like to fix for 6 - 7 minutes using the same agitation as in developing. I've read that it is difficult to over fix and I haven't yet.
Once the film is developed, I hang dry it in the main bathroom (I run the shower for about 15 minutes before hand to keep any dust from ending up on the film as it dries)
Once dry I scan it to my computer with an Epson V550 scanner and store the negatives in archival sheets and binders.
What is your go to developer?
I like Ilfosol 3 because it's low maintenance. I can mix it and go. Unlike a powder mixes like D76 where I have to mix it ahead of time and let it cool.
What is your all time favorite Film/Film developer combo?
I can't give an opinion on this as I haven't been doing this long enough to have experimented with different combinations. I often use whatever I have in the house. Currently I have enough Ilfolsol 3 for two more rolls and a liter of D76 mixed/ready to go. I just picked up 3 - 5L mixes of Xtol and am excited to give it a try.
What result/look does this give?
I will say this... When I've developed HP5 in Ilfosol 3, I've found the results to be grainy with a nice contrast; however, Ilfosol3 with Tmax 400 ended up with a nicer grain and less contrast. Now, take it all with a grain of salt since, like I said, I haven't got the years of experience that many, more knowledgeable, folks may have.
Have you tried any or are you into any alternative processes, such as cyanotype?
I haven't done anything like cyanotype, but I have had great fun playing with caffinol. If you're unfamiliar... Caffinol is a process in which you create your own developer using instant coffee, vitamin C, and washing soda. (It smells as revolting as it sounds) A great video can be seen at https://www.youtube.com/watch?v=zYjOqcbBEco and many different recipes and guides can be found at http://www.caffenol.org/
What is the best processing tip you can give?
 1) Leave your phone, smart watch etc outside the darkroom! I learned this lesson a couple days ago when I forgot to take off my watch and, half way through loading some 120 film on a reel, it lit up.
2) Invest in a film puller - makes life soooooo much easier.
3) Set everything up the same way every time. Its so much easier to find the reel, scissors, film rolls etc... when you put them in the same place.
4) Label your film - often it will be weeks or months before you process some rolls (Gary Winogrand would let his film sit for a year) and it sucks trying to archive your stuff when you can't remember when/where the photo was taken, or what camera/ lens combo was used.
5) Make a note of what film is where in the tank and keep track of where it hangs when drying ( I work top to bottom/left to right - so when hanging the film the top roll in the tank is always on the left and the bottom roll is on the right (tank 1 is left, tank 2 is right.))
What is your darkroom? A room, closet or bathroom? Please tell us a bit about it.When it comes to developing film I use my whole house. The Laundry room (loading reels), the Main Bathroom (for drying the film) and the Kitchen (for mixing the chemicals and "souping" the film).
My darkroom does double duty as a laundry room. It works well since it has no windows and I've set a curtain before the door so no light sneaks through from the outer hall. The top of the washer and dryer make a good large workspace. I haven't expanded into printmaking yet. (I have an enlarger and all the accessories, but I need to build a proper darkroom before I can use them.)
What's your process? Tell us a bit about your developing routine, especially if it's tricky.
Before loading I check Massive Dev chart (http://www.digitaltruth.com/devchart.php) to ensure that the films I am developing have the same development times (not a concern for colour but important when developing black and white)
I make a note of each roll and its position in which tank.
ie. tank 1 - Top: HP5 - Olympus OM 10 - March 5 - Gastown
Bottom: HP5 - Canon QL17 - Feb 3 - Strathcona
I often check filmdev.org to see what other people are doing; but, for the most part, I like to stick to the tried and true methods found on the Massive dev chart website.
I don't do stand developing, not because I don't like it but because I haven't the patience to sit around waiting :) My general rule of thumb is agitate for the first 30 seconds and then 4 or 5 inversions every minute after that.
Sometimes I will pick up Ilfostop, but if I run out I do a water stop for two minutes (30 seconds agitation/empty/refill and repeat)
I use Ilford Rapid fix as my go to fixer and, even though it says three minutes is adequate, I like to fix for 6 - 7 minutes using the same agitation as in developing. I've read that it is difficult to over fix and I haven't yet.
Once the film is developed, I hang dry it in the main bathroom (I run the shower for about 15 minutes before hand to keep any dust from ending up on the film as it dries)
Once dry I scan it to my computer with an Epson V550 scanner and store the negatives in archival sheets and binders.
What is your go to developer?
I like Ilfosol 3 because it's low maintenance. I can mix it and go. Unlike a powder mixes like D76 where I have to mix it ahead of time and let it cool.
What is your all time favorite Film/Film developer combo?
I can't give an opinion on this as I haven't been doing this long enough to have experimented with different combinations. I often use whatever I have in the house. Currently I have enough Ilfolsol 3 for two more rolls and a liter of D76 mixed/ready to go. I just picked up 3 - 5L mixes of Xtol and am excited to give it a try.
What result/look does this give?
I will say this... When I've developed HP5 in Ilfosol 3, I've found the results to be grainy with a nice contrast; however, Ilfosol3 with Tmax 400 ended up with a nicer grain and less contrast. Now, take it all with a grain of salt since, like I said, I haven't got the years of experience that many, more knowledgeable, folks may have.
Have you tried any or are you into any alternative processes, such as cyanotype?
I haven't done anything like cyanotype, but I have had great fun playing with caffinol. If you're unfamiliar... Caffinol is a process in which you create your own developer using instant coffee, vitamin C, and washing soda. (It smells as revolting as it sounds) A great video can be seen at https://www.youtube.com/watch?v=zYjOqcbBEco and many different recipes and guides can be found at http://www.caffenol.org/
What is the best processing tip you can give?
1) Leave your phone, smart watch etc outside the darkroom! I learned this lesson a couple days ago when I forgot to take off my watch and, half way through loading some 120 film on a reel, it lit up.2) Invest in a film puller - makes life soooooo much easier.
3) Set everything up the same way every time. Its so much easier to find the reel, scissors, film rolls etc... when you put them in the same place.
4) Label your film - often it will be weeks or months before you process some rolls (Gary Winogrand would let his film sit for a year) and it sucks trying to archive your stuff when you can't remember when/where the photo was taken, or what camera/ lens combo was used.
5) Make a note of what film is where in the tank and keep track of where it hangs when drying ( I work top to bottom/left to right - so when hanging the film the top roll in the tank is always on the left and the bottom roll is on the right (tank 1 is left, tank 2 is right.))
Friday, April 17, 2015
Where can you develop film in Vancouver?
Looking for somewhere locally to develop 110, 35mm 120 Black & White &
C41 film? Well, the friendly staff at Rocket Repro are here to help!
Thanks to Martin for providing us with a little bit of their history and what services they offer.
 Most people think about Rocket Reprographics as “The Headshot Place” where actors and headshot photographers get their images printed. While this is certainly true, we do so much more than that, providing services for both professional and amateur photographers.
Rocket Repro began as an exclusively Black and White photo lab in the late 1980’s servicing a small number of professional photo studios. At that time all headshots and much fashion photography was shot and printed in Black and White. In the mid-90’s we took our lab retail with a storefront in Gastown and did Black and White film development and printing to include amateur photographers and enthusiasts as well as our professional clientele. (We even included budding photographer Brian Adams as a client - our Gastown neighbour before moving to London!) The next transition was to color processing and then ultimately to digital. We now provide a full spectrum of imaging services including digital output wide format, fine art prints as well as servicing Actors with headshots Canada wide.
But still, we have not forgotten our roots. We continue to process both Black and White as well as Color negative film, and we print and scan from negatives for both professionals still working in that medium as well as photo enthusiasts revisiting this lost art. We are very excited to see film make its resurgence and truly enjoy being part of this new film revolution.
ROCKET REPROGRAPHICS INC
403 West Cordova St. Vancouver BC
604.682.6000
www.rocketrepro.com
Rocket Repro began as an exclusively Black and White photo lab in the late 1980’s servicing a small number of professional photo studios. At that time all headshots and much fashion photography was shot and printed in Black and White. In the mid-90’s we took our lab retail with a storefront in Gastown and did Black and White film development and printing to include amateur photographers and enthusiasts as well as our professional clientele. (We even included budding photographer Brian Adams as a client - our Gastown neighbour before moving to London!) The next transition was to color processing and then ultimately to digital. We now provide a full spectrum of imaging services including digital output wide format, fine art prints as well as servicing Actors with headshots Canada wide.
But still, we have not forgotten our roots. We continue to process both Black and White as well as Color negative film, and we print and scan from negatives for both professionals still working in that medium as well as photo enthusiasts revisiting this lost art. We are very excited to see film make its resurgence and truly enjoy being part of this new film revolution.
ROCKET REPROGRAPHICS INC
403 West Cordova St. Vancouver BC
604.682.6000
www.rocketrepro.com
Thursday, April 9, 2015
Adventures in Chemistry: Darkroom Safety
Our friends over at Cineworks have a great course coming up!
ADVENTURES IN CHEMISTRY: DARKROOM SAFETY
19 April 2015—11:00am-1:00pm
Cineworks Annex, 235 Alexander Street
How many of us have ever handled darkroom chemicals without gloves? Or developed a print without tongs? We've all read the warnings on photographic chemicals, but how many of us have always heeded them? To the novice, many of the precautions sound like hyperbole designed to protect the manufacturer rather than inform the photographer. But the warnings are real. Chemicals commonly encountered in the darkroom range from the harmless to violent poisons. It is important for the darkroom enthusiast to understand the hazards faced in the pursuit of art. This class is designed to introduce students to the roles of chemicals in our photographic work, their risks, their benefits the procedures required to use them safely.
$15 Cineworks members; $20 non-members (plus taxes)
Bookings: https://darkroom-safety.eventbrite.ca
http://www.cineworks.ca/attend/event/97
Tuesday, March 24, 2015
Red Light in a Dark Room - Part 17
This week's wonderfully informative blog post is brought to you by John C. Hollemans. He has also sent in lots of great photos of the creation of this lovely home darkroom. Thanks so much for your thoughtful answers, John!
What is your darkroom? A room, closet or bathroom? Please tell us a bit about it.
The current darkroom built in 2013 is a former “walk-in closet” that was used as a darkroom by the previous owner of our house. It measures 84” x 62” with a 96” high ceiling. It is quite small compared with other darkrooms I have built (5 in total). The photos and layout drawing show what it looks like. Since I am right handed, my workflow is from left to right. The benches are arranged so that I work in a “clockwise” direction starting at the enlarger station. The top surfaces of the benches are quite high, and are 4” below my elbow to be comfortable while standing. I never built a long sink to place development trays in. I use “rolled ends” or fresh newspapers on the bench top instead. The trays sit on this paper and protect the varnished surface from minor spills. Large spills are best avoided and when they do happen must be cleaned up immediately.
What's your process? Tell us a bit about your developing routine, especially if it's tricky.
Since I use black and white materials only at this time, there are two development processes; one for film and one for paper. For film developing I use the Paterson system tanks and reels. The reels accommodate 135 and 120 films very easily. When you use a camera that “counter winds” the film on the pickup spool (many cameras do this to counteract the film curl) it is often necessary to heat the reel with a hair dryer to make sure that it is absolutely dry. A 36 exposure "counter wound” roll will frequently not go all the way into the reel if it is not perfectly dry. The Paterson tanks are very good since they fill quickly and empty quickly. After a film is washed I immerse it clean water with a bit of Photoflo 200, then remove it from the reel and hang it in a tall home made dust free film dryer cabinet. It is best to never touch the film with your fingers or a squeegee. For paper developing I use trays for sizes up to 11” x 14”. They barely fit on the “wet” bench. For 16” x 20” prints I use a drum on an electric drum roller. Washing of large prints is also done in a drum.
What is your go to film developer?
In the past I experimented heavily with various films and developers, and concluded that a one-shot developer was best for me. I use the old Agfa Rodinal developer which is now available again as Blazinal, made in the Toronto area. You can buy it from Beau Photo. I tend to use dilutions of 1:25 or 1:50. As a backup developer I also use a high acutance developer formulated by Willie Beutler. You need to compound this from basic ingredients. It is a one-shot developer as well.
What is your all time favourite film/film developer combo?
I get fine results from Ilford FP4+ (135 type) and Rodinal. Kodak T-Max 100 and Rodinal are also a very good combination. I have recently tested Fuji Neopan Acros 100 (135 type) with Rodinal and like the results.
What result/look does this give?
The Fuji Neopan Acros 100 has a superb tonal scale in both shadow and highlight areas. It has very fine grain. A 16” x 20” enlargement made from an Acros 100 negative is just as “grainless" as one made from an old Agfa 50 ISO film negative.
What is your all time favourite paper/paper developer combo?
I began making prints when I was 16 years old when growing up in The Netherlands. You could only buy graded papers by Agfa and GAF. I preferred Agfa Brovira and made my own developer and fixer from chemicals purchased at a local drugstore. Today I mostly use Ilford’s RC Multigrade IV paper with the modern contrast filters for the enlarger. There are literally dozens of paper developers. The late Ansel Adams preferred Agfa/GAF 130 developer <http://simmonsphotos.com/Formulas/Paper/Agfa130.html>.
I never tried this developer since it contains glycin, an expensive chemical. My standard paper developer is Kodak Dektol or D72 and I have used it for a very long time. It provides a fine neutral black on both fibre and RC based papers. Keeping properties are very good. You can buy this developer in Kodak packages if still available, or you can use an Ilford equivalent. If that fails you can always compound your own from scratch.
Have you tried any or are you into any alternative processes, such as cyanotype?
I have not tried cyanotype process since it requires a large format camera. However, I have made many prints in sepia using a two bath toning process. Years ago I developed my own colour negative and slide films using the C41 and E6 processes. I even made black and white slides from Kodak Panatomic X film with a reversal process. In addition I created small and large colour prints using the EP2 process. Colour film development and printing is normally done at a temperature of 38ºC or 100ºF. So, a thermostatically controlled water bath is needed to maintain processing solutions and development tanks and drums at the correct temperature. This equipment complicates processing of colour materials, while printing on paper requires colour balancing with a colour analyser. You need a fairly large darkroom to accommodate this type of equipment. That is why I now stick to simple black and white techniques.
What is the best processing tip you can give?
There are many tips I could give. The most important tip is that the carrying out of all darkroom processes must be totally consistent and repeatable. In a darkroom we are dealing with processes that require precise dilution of chemicals, exact timing and handling of solutions at specified temperatures. To make sure that you can duplicate a given result in the future you must write down excellent notes while developing film and making prints. You need to make sure that your notes make sense to you years from now. If you experiment, your notes will allow you to analyze the results, and converge faster on the image quality you want. I began writing a logbook in 1974.
What are some general comments?
Instead of a handwritten logbook another possibility is to record your work in a suitable computer database. I have negatives and slides going back over 40 years. Slides are kept in marked plastic boxes and sleeves. Black and white plus colour negatives are stored in good quality #10 envelopes. Each envelope shows date, film type, development, location, subjects and any other useful information. I am still entering the information on the envelopes into a database. You could use an MS Excel sheet, or better still a proper database provided by an office suite such as "zero cost" LibreOffice or OpenOffice. The same idea applies to prints you made and possibly sold to customers. There are some good computer based tools available for professional photographers.
See below for some great photos of the creation of John's darkroom!


What is your darkroom? A room, closet or bathroom? Please tell us a bit about it.
The current darkroom built in 2013 is a former “walk-in closet” that was used as a darkroom by the previous owner of our house. It measures 84” x 62” with a 96” high ceiling. It is quite small compared with other darkrooms I have built (5 in total). The photos and layout drawing show what it looks like. Since I am right handed, my workflow is from left to right. The benches are arranged so that I work in a “clockwise” direction starting at the enlarger station. The top surfaces of the benches are quite high, and are 4” below my elbow to be comfortable while standing. I never built a long sink to place development trays in. I use “rolled ends” or fresh newspapers on the bench top instead. The trays sit on this paper and protect the varnished surface from minor spills. Large spills are best avoided and when they do happen must be cleaned up immediately.
What's your process? Tell us a bit about your developing routine, especially if it's tricky.
Since I use black and white materials only at this time, there are two development processes; one for film and one for paper. For film developing I use the Paterson system tanks and reels. The reels accommodate 135 and 120 films very easily. When you use a camera that “counter winds” the film on the pickup spool (many cameras do this to counteract the film curl) it is often necessary to heat the reel with a hair dryer to make sure that it is absolutely dry. A 36 exposure "counter wound” roll will frequently not go all the way into the reel if it is not perfectly dry. The Paterson tanks are very good since they fill quickly and empty quickly. After a film is washed I immerse it clean water with a bit of Photoflo 200, then remove it from the reel and hang it in a tall home made dust free film dryer cabinet. It is best to never touch the film with your fingers or a squeegee. For paper developing I use trays for sizes up to 11” x 14”. They barely fit on the “wet” bench. For 16” x 20” prints I use a drum on an electric drum roller. Washing of large prints is also done in a drum.
What is your go to film developer?
In the past I experimented heavily with various films and developers, and concluded that a one-shot developer was best for me. I use the old Agfa Rodinal developer which is now available again as Blazinal, made in the Toronto area. You can buy it from Beau Photo. I tend to use dilutions of 1:25 or 1:50. As a backup developer I also use a high acutance developer formulated by Willie Beutler. You need to compound this from basic ingredients. It is a one-shot developer as well.
What is your all time favourite film/film developer combo?
I get fine results from Ilford FP4+ (135 type) and Rodinal. Kodak T-Max 100 and Rodinal are also a very good combination. I have recently tested Fuji Neopan Acros 100 (135 type) with Rodinal and like the results.
What result/look does this give?
The Fuji Neopan Acros 100 has a superb tonal scale in both shadow and highlight areas. It has very fine grain. A 16” x 20” enlargement made from an Acros 100 negative is just as “grainless" as one made from an old Agfa 50 ISO film negative.
What is your all time favourite paper/paper developer combo?
I began making prints when I was 16 years old when growing up in The Netherlands. You could only buy graded papers by Agfa and GAF. I preferred Agfa Brovira and made my own developer and fixer from chemicals purchased at a local drugstore. Today I mostly use Ilford’s RC Multigrade IV paper with the modern contrast filters for the enlarger. There are literally dozens of paper developers. The late Ansel Adams preferred Agfa/GAF 130 developer <http://simmonsphotos.com/Formulas/Paper/Agfa130.html>.
I never tried this developer since it contains glycin, an expensive chemical. My standard paper developer is Kodak Dektol or D72 and I have used it for a very long time. It provides a fine neutral black on both fibre and RC based papers. Keeping properties are very good. You can buy this developer in Kodak packages if still available, or you can use an Ilford equivalent. If that fails you can always compound your own from scratch.
Have you tried any or are you into any alternative processes, such as cyanotype?
I have not tried cyanotype process since it requires a large format camera. However, I have made many prints in sepia using a two bath toning process. Years ago I developed my own colour negative and slide films using the C41 and E6 processes. I even made black and white slides from Kodak Panatomic X film with a reversal process. In addition I created small and large colour prints using the EP2 process. Colour film development and printing is normally done at a temperature of 38ºC or 100ºF. So, a thermostatically controlled water bath is needed to maintain processing solutions and development tanks and drums at the correct temperature. This equipment complicates processing of colour materials, while printing on paper requires colour balancing with a colour analyser. You need a fairly large darkroom to accommodate this type of equipment. That is why I now stick to simple black and white techniques.
What is the best processing tip you can give?
There are many tips I could give. The most important tip is that the carrying out of all darkroom processes must be totally consistent and repeatable. In a darkroom we are dealing with processes that require precise dilution of chemicals, exact timing and handling of solutions at specified temperatures. To make sure that you can duplicate a given result in the future you must write down excellent notes while developing film and making prints. You need to make sure that your notes make sense to you years from now. If you experiment, your notes will allow you to analyze the results, and converge faster on the image quality you want. I began writing a logbook in 1974.
What are some general comments?
Instead of a handwritten logbook another possibility is to record your work in a suitable computer database. I have negatives and slides going back over 40 years. Slides are kept in marked plastic boxes and sleeves. Black and white plus colour negatives are stored in good quality #10 envelopes. Each envelope shows date, film type, development, location, subjects and any other useful information. I am still entering the information on the envelopes into a database. You could use an MS Excel sheet, or better still a proper database provided by an office suite such as "zero cost" LibreOffice or OpenOffice. The same idea applies to prints you made and possibly sold to customers. There are some good computer based tools available for professional photographers.
See below for some great photos of the creation of John's darkroom!
Monday, March 16, 2015
Red Light in a Dark Room - Part 16
This week we are excited to bring you a new installment from our series all about Stephen's darkroom and soon to be darkroom. Sounds like a very unique set up! We'd love to see photos once the new kitchen darkroom is going! Thanks a lot, Stephen.
What is your darkroom? A room, closet or bathroom? Please tell us a bit about it.
My darkroom consists of two moving blankets on either side of my windowless bathroom door, for the time being. I have recently purchased some blackout fabric. The panels are going to be sewn together to create walls and are then going to be attached, floor to ceiling, with 2” Velcro around my kitchen. It will have everything I need in there. Ventilation (oven fan), Wet side (sink) and Dry side (counter space). Now I just have to figure out where I am going to do my cooking. Yes I live alone.
What's your process? Tell us a bit about your developing routine, especially if it's tricky.
My process is very standard. I use Paterson tanks and reels in 35 and 120 formats. I always pre-soak the film for 1 minute or so in 20.5-21C water then add my 20C developer. I agitate by inversion continuously for the first minute then 1 inversion every 30 seconds thereafter. My stop bath is also at 20C, continuous agitation for 1 minute and the fix is somewhere close to 20C, continuous agitation for the first minute and 1 inversion every 30 seconds thereafter again. The film is rinsed thoroughly in water. I then let it sit in a water bath for 10 minutes and repeat this step 3 times for a total of 30 minutes. I am trying to reduce the amount of water I use. Then hang to dry in my bathroom that I had a shower in to get any dust down.
I also stand develop film and love the results with this process. I will let it sit for 60, 90, 120 minutes, just for fun. I have even put borax in my developer at times and I am going to try using salt water with my developer as well just to see what happens.
I will cross process anything by stand developing.
What is your go to developer?
My go to developer is Blazinal. Love this stuff. I just purchased some Xtol and mixed that up the other day.
I will shoot a roll of 35mm film of 24 or 36 exposures, go in my darkroom and cut the film in half, put each half on a separate spool and process in different developers.
What is your all-time favorite Film/Film developer combo?
I haven’t figured that out yet.
I jump around with so many different combinations. I use Blazinal and Xtol, which I mentioned, as my developers and I shoot Ilford Pan F, HP5+ and Delta 100. In Kodak stock I use Tri X 400.
What result/look does this give?
So far the look that I am achieving with all these different combinations is just what I have been hoping for, Black, White and a bunch of different tones of grey.
I need to focus on one developer and one film for a while to find what really speaks to me. I am going to work with Blazinal, HP5+ and see what happens.
Have you tried any or are you into any alternative processes, such as cyanotype?
I have played around with the gum dichromate process and produced one piece from that. When the time comes I will do more of it but for now I am consumed with the B&W process.
What is the best processing tip you can give?
Don’t be afraid to make mistakes. Film is cheap and even mistakes are to be learned from. Experimentation keeps things from getting stale.
Don’t drink anything when you are in the darkroom!!!
Below is a sample of the Gum print Stephen tried out.

What is your darkroom? A room, closet or bathroom? Please tell us a bit about it.
My darkroom consists of two moving blankets on either side of my windowless bathroom door, for the time being. I have recently purchased some blackout fabric. The panels are going to be sewn together to create walls and are then going to be attached, floor to ceiling, with 2” Velcro around my kitchen. It will have everything I need in there. Ventilation (oven fan), Wet side (sink) and Dry side (counter space). Now I just have to figure out where I am going to do my cooking. Yes I live alone.
What's your process? Tell us a bit about your developing routine, especially if it's tricky.
My process is very standard. I use Paterson tanks and reels in 35 and 120 formats. I always pre-soak the film for 1 minute or so in 20.5-21C water then add my 20C developer. I agitate by inversion continuously for the first minute then 1 inversion every 30 seconds thereafter. My stop bath is also at 20C, continuous agitation for 1 minute and the fix is somewhere close to 20C, continuous agitation for the first minute and 1 inversion every 30 seconds thereafter again. The film is rinsed thoroughly in water. I then let it sit in a water bath for 10 minutes and repeat this step 3 times for a total of 30 minutes. I am trying to reduce the amount of water I use. Then hang to dry in my bathroom that I had a shower in to get any dust down.
I also stand develop film and love the results with this process. I will let it sit for 60, 90, 120 minutes, just for fun. I have even put borax in my developer at times and I am going to try using salt water with my developer as well just to see what happens.
I will cross process anything by stand developing.
What is your go to developer?
My go to developer is Blazinal. Love this stuff. I just purchased some Xtol and mixed that up the other day.
I will shoot a roll of 35mm film of 24 or 36 exposures, go in my darkroom and cut the film in half, put each half on a separate spool and process in different developers.
What is your all-time favorite Film/Film developer combo?
I haven’t figured that out yet.
I jump around with so many different combinations. I use Blazinal and Xtol, which I mentioned, as my developers and I shoot Ilford Pan F, HP5+ and Delta 100. In Kodak stock I use Tri X 400.
What result/look does this give?
So far the look that I am achieving with all these different combinations is just what I have been hoping for, Black, White and a bunch of different tones of grey.
I need to focus on one developer and one film for a while to find what really speaks to me. I am going to work with Blazinal, HP5+ and see what happens.
Have you tried any or are you into any alternative processes, such as cyanotype?
I have played around with the gum dichromate process and produced one piece from that. When the time comes I will do more of it but for now I am consumed with the B&W process.
What is the best processing tip you can give?
Don’t be afraid to make mistakes. Film is cheap and even mistakes are to be learned from. Experimentation keeps things from getting stale.
Don’t drink anything when you are in the darkroom!!!
Below is a sample of the Gum print Stephen tried out.
Monday, March 9, 2015
Red Light in a Dark Room - Part 15
For this week's Red Light in a Dark Room we are very happy to learn more about Russel and Wendy's wonderful home darkroom.
Wendy and Russel Kwan are fine art photographers, exclusively producing their limited-edition work as toned fiber-based silver-gelatin prints in their studio and darkroom. Their work has been exhibited in Canada and the US in commercial and academic museums and galleries. Their next scheduled solo show, "Space + Time" will be at Visual Space Gallery in Vancouver, 21 Aug to 5 Sep 2015. They are the black-and-white darkroom instructors in Continuing Studies at Langara College (next course "Basic Darkroom PHTG 1003" starts Tue 5 May 2015), and independently operate their Photography MicroSchool (these courses have nothing to do with darkrooms!) in Vancouver (next courses start in May 2015).
What is your darkroom? A room, closet or bathroom? Please tell us a bit about it.


We have a darkroom tour page on our website: http://NewMythographs.com/pages/rwpMainframeDarkroom.html .
Our darkroom is a purpose-built 9x13 foot room with a custom stainless-steel sink running the length of one side, and cabinets / enlarger workstation on the other. It is built for efficiency, so we can make mistakes really fast.
What's your process? Tell us a bit about your developing routine, especially if it's tricky.
We use a variety of processes, including some secret home-brew chemistries - but the basic stuff is what many people use: Paterson tanks and reels and a traditional print tray-line. We do have a film processor for straight photography - it's a Photo-Therm SSK-8, and it's a trouper.
What is your go to developer?
Russ uses a variety of home-brews, none of which are published, as well as Kodak HC-110. HC-110 works much better when it's been aged a lot. So does Blazinal. Wendy uses Ilford Perceptol.
What is your all time favorite Film/Film developer combo?
Russ uses HP5 & HC-110, and Rollei IR & HC-110 a lot. Wendy uses Delta 400 & Perceptol, and Ilford SFx & Perceptol. It probably should be noted that we don't use any film or chemistry (other than fixer) according to the manufacturer's instructions.
What result/look does this give?
It's a total light-path thing. Everything matters, from lens to camera to film-format & film to development regime to enlarger type to enlarger lens to print paper to print processing to toning. Neither of us has a single "look" - rather, we invent new looks for every body of work. There's no way to assess a look online - to see it, you'll need to see the finished prints.
Have you tried any or are you into any alternative processes, such as cyanotype?
We've tried lots of things, including gum, lith and cyanotype - but silver remains the most flexible and malleable medium for both of us. Home-brew chemistry can totally transform silver, allowing the medium to do completely new things.
What is the best processing tip you can give?
Keep ridiculously complete and detailed notes. Be consistent with everything. Change only one thing at a time. Make copious mistakes and keep close track of the cool ones. Bravely and ceaselessly experiment.
Wendy and Russel Kwan are fine art photographers, exclusively producing their limited-edition work as toned fiber-based silver-gelatin prints in their studio and darkroom. Their work has been exhibited in Canada and the US in commercial and academic museums and galleries. Their next scheduled solo show, "Space + Time" will be at Visual Space Gallery in Vancouver, 21 Aug to 5 Sep 2015. They are the black-and-white darkroom instructors in Continuing Studies at Langara College (next course "Basic Darkroom PHTG 1003" starts Tue 5 May 2015), and independently operate their Photography MicroSchool (these courses have nothing to do with darkrooms!) in Vancouver (next courses start in May 2015).
What is your darkroom? A room, closet or bathroom? Please tell us a bit about it.
We have a darkroom tour page on our website: http://NewMythographs.com/pages/rwpMainframeDarkroom.html .
Our darkroom is a purpose-built 9x13 foot room with a custom stainless-steel sink running the length of one side, and cabinets / enlarger workstation on the other. It is built for efficiency, so we can make mistakes really fast.
What's your process? Tell us a bit about your developing routine, especially if it's tricky.
We use a variety of processes, including some secret home-brew chemistries - but the basic stuff is what many people use: Paterson tanks and reels and a traditional print tray-line. We do have a film processor for straight photography - it's a Photo-Therm SSK-8, and it's a trouper.
What is your go to developer?
Russ uses a variety of home-brews, none of which are published, as well as Kodak HC-110. HC-110 works much better when it's been aged a lot. So does Blazinal. Wendy uses Ilford Perceptol.
What is your all time favorite Film/Film developer combo?
Russ uses HP5 & HC-110, and Rollei IR & HC-110 a lot. Wendy uses Delta 400 & Perceptol, and Ilford SFx & Perceptol. It probably should be noted that we don't use any film or chemistry (other than fixer) according to the manufacturer's instructions.
What result/look does this give?
It's a total light-path thing. Everything matters, from lens to camera to film-format & film to development regime to enlarger type to enlarger lens to print paper to print processing to toning. Neither of us has a single "look" - rather, we invent new looks for every body of work. There's no way to assess a look online - to see it, you'll need to see the finished prints.
Have you tried any or are you into any alternative processes, such as cyanotype?
We've tried lots of things, including gum, lith and cyanotype - but silver remains the most flexible and malleable medium for both of us. Home-brew chemistry can totally transform silver, allowing the medium to do completely new things.
What is the best processing tip you can give?
Keep ridiculously complete and detailed notes. Be consistent with everything. Change only one thing at a time. Make copious mistakes and keep close track of the cool ones. Bravely and ceaselessly experiment.
Tuesday, March 3, 2015
Red Light in a Dark Room - Part 14
Thanks a lot to Nigel for his great darkroom info this week! It's interesting to learn about some different alternative processes as well.
What is your darkroom? A room, closet or bathroom? Please tell us a bit about it.
I'm fortunate to have light-proof, interior bathrooms in the places I've lived - which makes handling film, controlling dust and keeping a steady temperature a lot simpler. With 4x5 film I'm really careful about dust, a bit OCD with vacuuming the bathroom ceiling to floor, the film holders, the camera and so on.
I'm fortunate to have light-proof, interior bathrooms in the places I've lived - which makes handling film, controlling dust and keeping a steady temperature a lot simpler. With 4x5 film I'm really careful about dust, a bit OCD with vacuuming the bathroom ceiling to floor, the film holders, the camera and so on.
I've drifted away from silver-gelatin printmaking over the years but after seeing Lee Freidlander's wonderful show at Presentation House, I'm seriously thinking about squeezing a 4x5 enlarger into that bathroom.
What is your process? Tell us a bit about your developing routine, especially if it's tricky.
There's nothing very special about my developing routine. Good control over the processing time/temperature is the most important thing. Lately I've been using a cool little iPhone custom timer app from Kodak Film which beeps on cue and has a safelight display. To control temperature, I start with the room - I aim to keep temp in the bathroom at 20C, and stand my processing drum, chemicals and large bucket of water in the room overnight, so everything is at 20C. I use that water to make up the develop/fix solutions, also for a rinse to halt the development. Sometimes in colder weather I'll use an aquarium heater to maintain the water temperature. I use a Jobo drum for 4x5 processing - nothing fancy, fill with a funnel and roll it gently back and forth on a towel on the floor. I also have a couple of reel/drum tanks for roll film. For washing, I use a Polaroid P/N film bucket, originally intended to hold and clear Polaroid Type 55 negs in the field. But it also works great to wash reels and sheet film. After washing under the tap (also around 20C but not so critical) for an hour or so, I dip the film in Photoflo solution and clip on a line rigged in the shower to dry overnight.
What is your go to developer?
Early on I tried Rodinal at 1+25 and I've stuck with that. I've also used Xtol for roll film, and have dabbled with PMK (pyrogallol metol staining developer) under full hazmat protocols :-)
What is your all time favorite Film/Film developer combo?
HP5+ and Rodinal.
What result/look does this give?
HP5+/Rodinal gives me a solid 4x5 neg with good density and tonal separation in the mid and light grays. The light and shadows here on the west coast are fairly blue - especially strongly lit seascapes/mountainscapes - so I generally use a 2-stop yellow-orange lens filter to improve sky definition and shadow contrast. With HP5+ I end up with a handy working speed of 100 after the filter factor; with Rodinal the whole analog image chain just seems to fall into place.
Have you tried any alternative processes, such as cyanotype?
I've experimented with PMK processing and the ziatype (platinum/palladium) printing process to make 4X5 contact prints. It's a neat but finicky process that relies on a slightly damp paper emulsion. It's quite a bit of work to get the paper and coating routine dialed in. I also ended up building a UV light hood to guarantee a source of "sunshine". But the prints turn out to be wonderful, gloriously tactile objects.
I’m very attached to polaroid processes and have had some nice results using the Impossible SX70 film. I sincerely hope the New55 project eventually comes to fruition - I have about a box and a half of old and now rather dodgy Type 55 left - it's a bit of a personal ritual for me to expose a few sheets every year just for the experience.
What is the best processing tip you can give?
Be methodical and keep notes. Get a good thermometer! Have fun and don’t process any critical images until you’re well dialed in.
What is your process? Tell us a bit about your developing routine, especially if it's tricky.
There's nothing very special about my developing routine. Good control over the processing time/temperature is the most important thing. Lately I've been using a cool little iPhone custom timer app from Kodak Film which beeps on cue and has a safelight display. To control temperature, I start with the room - I aim to keep temp in the bathroom at 20C, and stand my processing drum, chemicals and large bucket of water in the room overnight, so everything is at 20C. I use that water to make up the develop/fix solutions, also for a rinse to halt the development. Sometimes in colder weather I'll use an aquarium heater to maintain the water temperature. I use a Jobo drum for 4x5 processing - nothing fancy, fill with a funnel and roll it gently back and forth on a towel on the floor. I also have a couple of reel/drum tanks for roll film. For washing, I use a Polaroid P/N film bucket, originally intended to hold and clear Polaroid Type 55 negs in the field. But it also works great to wash reels and sheet film. After washing under the tap (also around 20C but not so critical) for an hour or so, I dip the film in Photoflo solution and clip on a line rigged in the shower to dry overnight.
What is your go to developer?
Early on I tried Rodinal at 1+25 and I've stuck with that. I've also used Xtol for roll film, and have dabbled with PMK (pyrogallol metol staining developer) under full hazmat protocols :-)
What is your all time favorite Film/Film developer combo?
HP5+ and Rodinal.
What result/look does this give?
HP5+/Rodinal gives me a solid 4x5 neg with good density and tonal separation in the mid and light grays. The light and shadows here on the west coast are fairly blue - especially strongly lit seascapes/mountainscapes - so I generally use a 2-stop yellow-orange lens filter to improve sky definition and shadow contrast. With HP5+ I end up with a handy working speed of 100 after the filter factor; with Rodinal the whole analog image chain just seems to fall into place.
Have you tried any alternative processes, such as cyanotype?
I've experimented with PMK processing and the ziatype (platinum/palladium) printing process to make 4X5 contact prints. It's a neat but finicky process that relies on a slightly damp paper emulsion. It's quite a bit of work to get the paper and coating routine dialed in. I also ended up building a UV light hood to guarantee a source of "sunshine". But the prints turn out to be wonderful, gloriously tactile objects.
I’m very attached to polaroid processes and have had some nice results using the Impossible SX70 film. I sincerely hope the New55 project eventually comes to fruition - I have about a box and a half of old and now rather dodgy Type 55 left - it's a bit of a personal ritual for me to expose a few sheets every year just for the experience.
What is the best processing tip you can give?
Be methodical and keep notes. Get a good thermometer! Have fun and don’t process any critical images until you’re well dialed in.
Here area few examples of Nigel's work.
For more, check out his website: atmosphericlens.com
HP5 in Rodinal

HP5 in PMK

HP5 in PMK/Ziatype Print

Monday, February 23, 2015
Red Light in a Dark Room - Part 13
Thanks a lot to Joe for his very concise development routine for this weeks installment!
What is your darkroom? A room, closet or bathroom? Please tell us a bit about it.
I use a very large film changing bag as my darkroom, along with Paterson film tanks.
What's your process, talk a bit about your developing routine, especially if it's tricky.
Here is my routine, very simple and quick. I put my film camera in the changing bag, load the film into the Paterson tanks
Take the loaded tanks to my kitchen and start the process of development.
What's your go to developer?
Ilford Ilfotec DD-X
What's your all time favorite Film/Film developer combo?
Ilford HP5 and Ilford Ilfotec DD-X
What result/look does this give?
1950-1960 FILM LOOK
Have you tried or are you into any alternative processes, such as cyanotype?
Yes, right now at this moment I just received my tintype kit so I’ll be doing Tintype this week. I am signed up for a wet plate collodian workshop in April that I am really looking forward to.
What is the best processing tip you can give?
Develop a routine, a method, a system, makes the workflow much easier.
What is your darkroom? A room, closet or bathroom? Please tell us a bit about it.
I use a very large film changing bag as my darkroom, along with Paterson film tanks.
What's your process, talk a bit about your developing routine, especially if it's tricky.
Here is my routine, very simple and quick. I put my film camera in the changing bag, load the film into the Paterson tanks
Take the loaded tanks to my kitchen and start the process of development.
What's your go to developer?
Ilford Ilfotec DD-X
What's your all time favorite Film/Film developer combo?
Ilford HP5 and Ilford Ilfotec DD-X
What result/look does this give?
1950-1960 FILM LOOK
Have you tried or are you into any alternative processes, such as cyanotype?
Yes, right now at this moment I just received my tintype kit so I’ll be doing Tintype this week. I am signed up for a wet plate collodian workshop in April that I am really looking forward to.
What is the best processing tip you can give?
Develop a routine, a method, a system, makes the workflow much easier.
Monday, February 16, 2015
Red Light in a Dark Room - Part 12
This week we hear from Kevin who has an interesting traveling dark room set up that he can take along on all his travels. Thanks for sharing with us, Kevin!
What is your darkroom? A room, closet or bathroom?
The kind of photography I have done for the last number of years might best be described as urban hiking. Therefore I need a camera that is simple, easy to use, can do both architectural photography, as well as point and shoot and doesn't weigh a ton! The answer I found was a Speed Graflex. These cameras are much underrated but nothing comes close for ease of use and versatility. I acquired one that was fully functional with a coupled rangefinder for less than $500 at an estate sale. One photo at the bottom is a hand held shot (boy on tightrope) and the other is of architecture.
 I have shot large format for over 20 years and have learned if you want to survive at this sport you need to keep things simple and straightforward. After trying all kinds of exotic developing methods, I found that four sheets face up in the bottom of a tray works best. I made a special tray by gluing plastic guides to an old paper tray. As I often travel and needed a way to develop the film in the hotel bathroom - and this fits the bill.
What's your all time favorite Film/Film developer combo and what results does this give you?
My preferred film/developer combination is Ilford Delta 100 and Kodak Xtol. This gives a nice smooth evenly stepped tonal scale and allows for 4X enlargement of the negative without the grain showing. Although I have tried platinum printing, which produces a beautiful image, I find that having a large neg and then using split contrast printing produces what I am looking - generous detail.
What is the best processing tip you can give?
When it comes to processing film I have found that slow is best. I usually dilute the developer and use a semi-stand method when I have a 5 stop or greater of dynamic range. I keep the time negs are in the developer at about 30 minutes - which is sufficient for the negs to "stand" several times for 5 minutes preventing the highlights from going off the scale. When I have 4 stops or less then I use a 1:1 dilution, shorten the time and use continual agitation. Even though I use variable contrast printing I still follow the basic rule of 19th century photographers "expose for the shadows and develop for the highlights."
Below are a couple of examples from a recent trip to Lisbon.


What is your darkroom? A room, closet or bathroom?

The kind of photography I have done for the last number of years might best be described as urban hiking. Therefore I need a camera that is simple, easy to use, can do both architectural photography, as well as point and shoot and doesn't weigh a ton! The answer I found was a Speed Graflex. These cameras are much underrated but nothing comes close for ease of use and versatility. I acquired one that was fully functional with a coupled rangefinder for less than $500 at an estate sale. One photo at the bottom is a hand held shot (boy on tightrope) and the other is of architecture.
I have shot large format for over 20 years and have learned if you want to survive at this sport you need to keep things simple and straightforward. After trying all kinds of exotic developing methods, I found that four sheets face up in the bottom of a tray works best. I made a special tray by gluing plastic guides to an old paper tray. As I often travel and needed a way to develop the film in the hotel bathroom - and this fits the bill.What's your all time favorite Film/Film developer combo and what results does this give you?
My preferred film/developer combination is Ilford Delta 100 and Kodak Xtol. This gives a nice smooth evenly stepped tonal scale and allows for 4X enlargement of the negative without the grain showing. Although I have tried platinum printing, which produces a beautiful image, I find that having a large neg and then using split contrast printing produces what I am looking - generous detail.
What is the best processing tip you can give?
When it comes to processing film I have found that slow is best. I usually dilute the developer and use a semi-stand method when I have a 5 stop or greater of dynamic range. I keep the time negs are in the developer at about 30 minutes - which is sufficient for the negs to "stand" several times for 5 minutes preventing the highlights from going off the scale. When I have 4 stops or less then I use a 1:1 dilution, shorten the time and use continual agitation. Even though I use variable contrast printing I still follow the basic rule of 19th century photographers "expose for the shadows and develop for the highlights."
Below are a couple of examples from a recent trip to Lisbon.
Friday, February 6, 2015
Red Light in a Dark Room - Part 11
We've got a double dose of our darkroom series this week as Monday is a holiday in BC and we will be closed. We thought we'd give you some extra reading for the weekend!
Thanks a lot to Ben for sharing his darkroom set up with us and showing us that you can construct some of these things yourself with a little know how and determination!
What is your darkroom? A room, closet or bathroom?
About two years ago, after a hiatus from photography, I decided to buy myself a digital camera. It was my first digital camera and, really, I had no idea what to expect. The real excitement was in the thought of taking photos again. Once I got to shooting I found myself fairly bored with the digital process. A yearning for my old Pentax K1000 started to creep in and within a month my DSLR was up for sale and I was on the hunt for a manual film camera.
Once I found a camera, I wanted to start developing my own film, so I ordered the basics and made friends with my new darkroom – the bathroom. It was fun for a while until I wanted more out of my results. So, I decided that bigger was better, which is not necessarily true, and bought myself an iconic medium format camera; a Hasselblad 500 C/M. At this point, I switched from colour to black and white and was on the lookout for some instruction.
There is a lovely couple in town who teach darkroom courses at one of the local colleges. I signed up and started to delve into the process. It was there that I fell in love the art of black and white photography. It inspired me so much that I started to search out a place to build my very own darkroom. Going back to the bathroom was not going to be good enough anymore.
It was in August that I finally found an establishment that would allow me to install a darkroom. It was 80 sq ft of nothing. No water, drain, electrical, venting, walls or ceiling, but I was ecstatic. Luckily I have some carpentry experience and tools, otherwise this would have been too daunting. It took me four months to properly install everything and have it running. I've included some photos at the bottom of this post.
What's your all time favorite Film/Film developer combo?
Over the past while I have gone through some of the more popular developers like Rodinal or ID-11, but I wasn't getting the results I wanted. Not that those are bad developers, I was just in the market for something else. The film I shoot is HP5+, which is, for better or worse, what I have stuck with this whole time. After a bit of research I showed up at Beau one day and put an order in for some raw chemicals. A couple weeks later, I was mixing up a recipe for a two bath developer. It is an old recipe that was refined by the late Barry Thornton.
What result/look does this give?
The first roll I developed turned out superb! It was sharp, had good tonal range and the contrast was balanced. If you are not familiar with this type of developer, it is a compensating developer. It will do the same job as a stand development with a diluted developer, but in a much shorter time and produces reliable results.
What is the best processing tip you can give?
My advice to anyone out there who is as obsessed with this stuff as I am, is to be persistent, take lots of notes on everything you do, and move slowly through making changes. This will get you to a place where you can start to visualize ideas and have the tools to render them onto a print. When that happens, it is magical. Also, gut feelings are just as important as standardization. Almost 100% of the time that I have a gut feeling and act on it, it turns out great.

Enlarger is a Saunders/LPL 670DXL with Dichroic head. The colour has been removed and I use the Ilford multigrade system for contrast control.
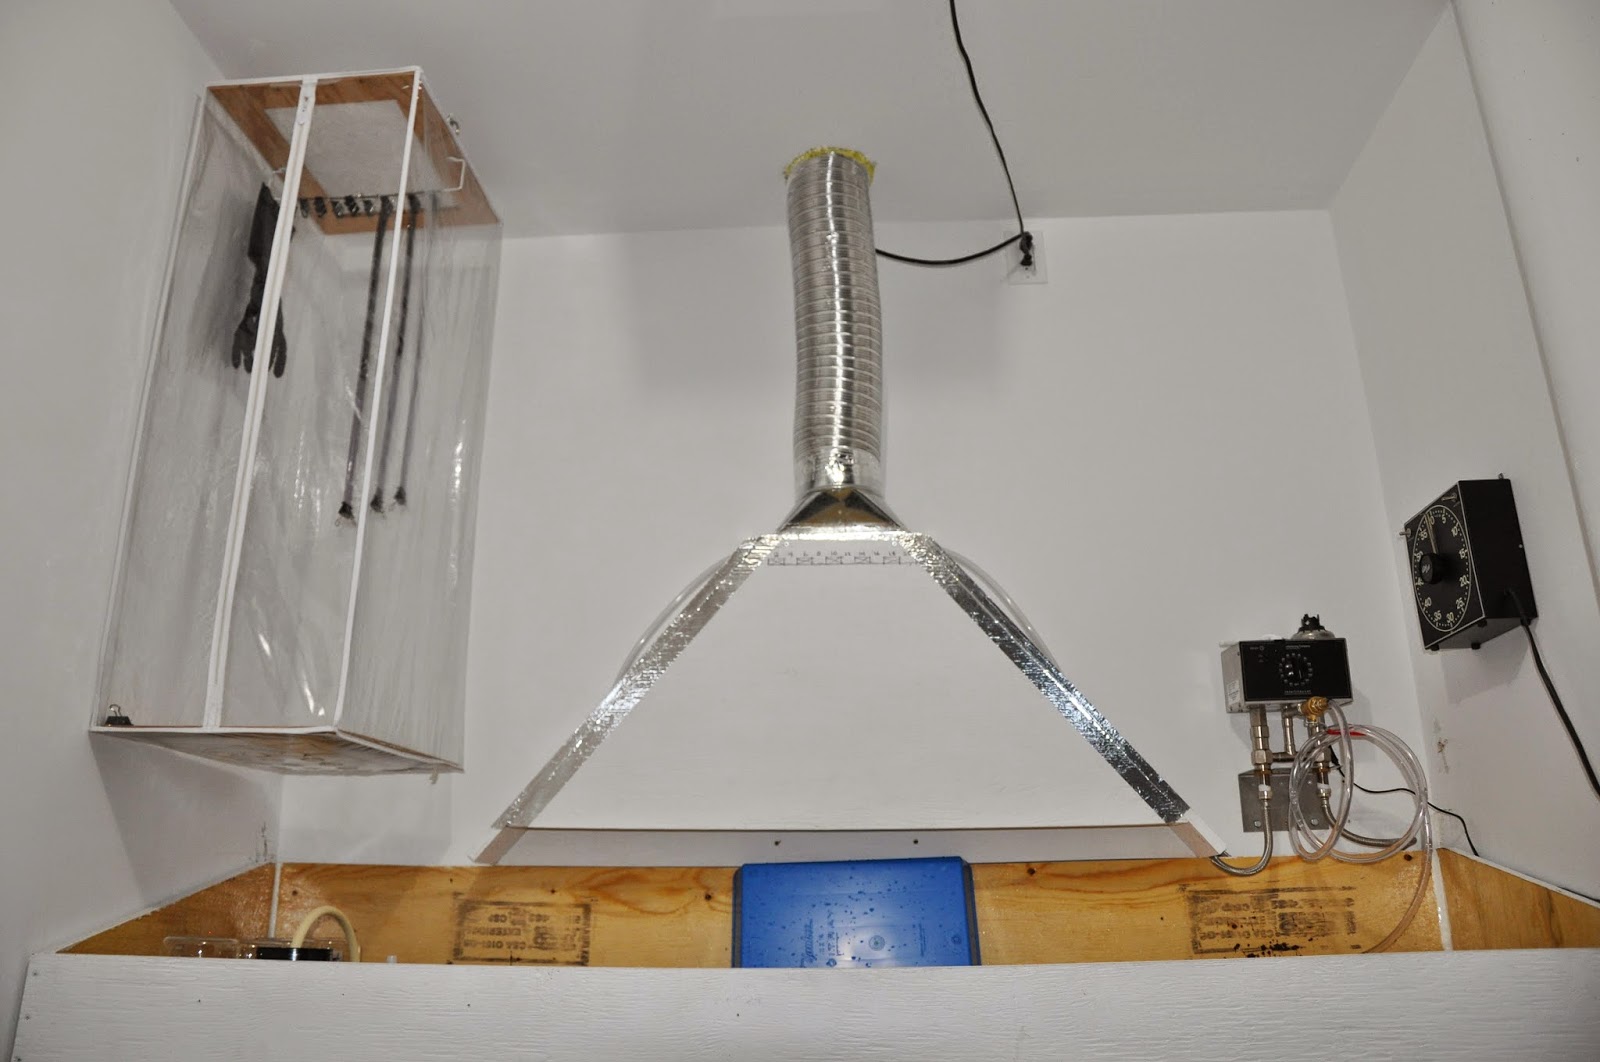
On the left is my homemade drying cabinet. In the middle is the negative venting hood. To the Right is an Intellifaucet D250, which controls the water temperature.

The sink is made out of plywood with 3 coats of marine grade epoxy for water proofing.

The room is completely air tight and this intake vent is the only way for air to enter. It is light tight and has a replaceable furnace filter inside.
Thanks a lot to Ben for sharing his darkroom set up with us and showing us that you can construct some of these things yourself with a little know how and determination!
What is your darkroom? A room, closet or bathroom?
About two years ago, after a hiatus from photography, I decided to buy myself a digital camera. It was my first digital camera and, really, I had no idea what to expect. The real excitement was in the thought of taking photos again. Once I got to shooting I found myself fairly bored with the digital process. A yearning for my old Pentax K1000 started to creep in and within a month my DSLR was up for sale and I was on the hunt for a manual film camera.
Once I found a camera, I wanted to start developing my own film, so I ordered the basics and made friends with my new darkroom – the bathroom. It was fun for a while until I wanted more out of my results. So, I decided that bigger was better, which is not necessarily true, and bought myself an iconic medium format camera; a Hasselblad 500 C/M. At this point, I switched from colour to black and white and was on the lookout for some instruction.
There is a lovely couple in town who teach darkroom courses at one of the local colleges. I signed up and started to delve into the process. It was there that I fell in love the art of black and white photography. It inspired me so much that I started to search out a place to build my very own darkroom. Going back to the bathroom was not going to be good enough anymore.
It was in August that I finally found an establishment that would allow me to install a darkroom. It was 80 sq ft of nothing. No water, drain, electrical, venting, walls or ceiling, but I was ecstatic. Luckily I have some carpentry experience and tools, otherwise this would have been too daunting. It took me four months to properly install everything and have it running. I've included some photos at the bottom of this post.
What's your all time favorite Film/Film developer combo?
Over the past while I have gone through some of the more popular developers like Rodinal or ID-11, but I wasn't getting the results I wanted. Not that those are bad developers, I was just in the market for something else. The film I shoot is HP5+, which is, for better or worse, what I have stuck with this whole time. After a bit of research I showed up at Beau one day and put an order in for some raw chemicals. A couple weeks later, I was mixing up a recipe for a two bath developer. It is an old recipe that was refined by the late Barry Thornton.
What result/look does this give?
The first roll I developed turned out superb! It was sharp, had good tonal range and the contrast was balanced. If you are not familiar with this type of developer, it is a compensating developer. It will do the same job as a stand development with a diluted developer, but in a much shorter time and produces reliable results.
What is the best processing tip you can give?
My advice to anyone out there who is as obsessed with this stuff as I am, is to be persistent, take lots of notes on everything you do, and move slowly through making changes. This will get you to a place where you can start to visualize ideas and have the tools to render them onto a print. When that happens, it is magical. Also, gut feelings are just as important as standardization. Almost 100% of the time that I have a gut feeling and act on it, it turns out great.
Enlarger is a Saunders/LPL 670DXL with Dichroic head. The colour has been removed and I use the Ilford multigrade system for contrast control.
On the left is my homemade drying cabinet. In the middle is the negative venting hood. To the Right is an Intellifaucet D250, which controls the water temperature.
The sink is made out of plywood with 3 coats of marine grade epoxy for water proofing.
The room is completely air tight and this intake vent is the only way for air to enter. It is light tight and has a replaceable furnace filter inside.
Monday, February 2, 2015
Red Light in a Dark Room - Part 10
This week we take a look at how and where August develops her film. Thanks for sharing, August! Your alternative process ideas are also very interesting! Good luck, and we'd love to see how they turn out.
What is your darkroom? A room, closet or bathroom? Please tell us a bit about it.
My darkroom is in the basement of the Dunbar Community Centre; it is one of the last public darkrooms in the Parks Board system, let alone in Vancouver Proper! It has a quasi-high school sense about it. The space itself is about 6x10 ft. It's cozy, but well equipped-everything you need for a black and white set-up.
What's your process? Tell us a bit about your developing routine, especially if it's tricky.
My process is pretty basic; I strive to create master prints and consistent negatives. I've had to get a little creative with my film developing, since we don't have much space or a print dryer in the darkroom. So far, the best place to dry film is the ladies shower room, since it has separate metal stalls that you can sneakily lock from the outside.
What is your go to developer?
Hands-down, Kodak's D-76.
What is your all time favorite Film/Film developer combo?
It has to be the now extinct old-formula Agfa APX in Kodak X-Tol developer. I made such amazing contrasty black and white prints with the perfect amount of grain and tonal range-I've so far not been able to replicate it. For the last few years I've switched between Kodak T-Max and stand-by Ilford HP5, usually processed in D-76.
What result/look does this give?
HP5 gives a nice tonal range that allows a fair bit of latitude when adjusting contrast. I love TMAX when I'm shooting landscapes and urban scenes-it is fun to push and pull this film to play around with the grain.
Have you tried any or are you into any alternative processes, such as cyanotype?
Yes-I have started to experiment with making some of my own chemistry, starting with a recipe to develop film using instant coffee! I'm also planning on making my own toner dyes if I can source the chemicals, and I also want to make a film developer formula that was intended to use to record nuclear blasts in the New Mexico and Nevada test grounds.
What is the best processing tip you can give?
When it comes to processing black and white, the most important detail is the temperature of your film developer. Get a film thermometer and make sure you're exactly on. Nothing ruins a roll of film like over and under-exposure, and you have only one chance with negatives. It's a good idea to have all your chemistry at the same room temp, but the developer is critical.
What is your darkroom? A room, closet or bathroom? Please tell us a bit about it.
My darkroom is in the basement of the Dunbar Community Centre; it is one of the last public darkrooms in the Parks Board system, let alone in Vancouver Proper! It has a quasi-high school sense about it. The space itself is about 6x10 ft. It's cozy, but well equipped-everything you need for a black and white set-up.
What's your process? Tell us a bit about your developing routine, especially if it's tricky.
My process is pretty basic; I strive to create master prints and consistent negatives. I've had to get a little creative with my film developing, since we don't have much space or a print dryer in the darkroom. So far, the best place to dry film is the ladies shower room, since it has separate metal stalls that you can sneakily lock from the outside.
What is your go to developer?
Hands-down, Kodak's D-76.
What is your all time favorite Film/Film developer combo?
It has to be the now extinct old-formula Agfa APX in Kodak X-Tol developer. I made such amazing contrasty black and white prints with the perfect amount of grain and tonal range-I've so far not been able to replicate it. For the last few years I've switched between Kodak T-Max and stand-by Ilford HP5, usually processed in D-76.
What result/look does this give?
HP5 gives a nice tonal range that allows a fair bit of latitude when adjusting contrast. I love TMAX when I'm shooting landscapes and urban scenes-it is fun to push and pull this film to play around with the grain.
Have you tried any or are you into any alternative processes, such as cyanotype?
Yes-I have started to experiment with making some of my own chemistry, starting with a recipe to develop film using instant coffee! I'm also planning on making my own toner dyes if I can source the chemicals, and I also want to make a film developer formula that was intended to use to record nuclear blasts in the New Mexico and Nevada test grounds.
What is the best processing tip you can give?
When it comes to processing black and white, the most important detail is the temperature of your film developer. Get a film thermometer and make sure you're exactly on. Nothing ruins a roll of film like over and under-exposure, and you have only one chance with negatives. It's a good idea to have all your chemistry at the same room temp, but the developer is critical.
Monday, January 26, 2015
Red Light in a Dark Room - Part 9
This week we are excited to take a look at Doug's darkroom! Looks like he has a great set up for printing. Thanks for the photos too, Doug.
What is your darkroom? A room, closet or bathroom? Please tell us a bit about it.
I have a Saunders LPL 6x7 Dichroic Enlarger that I set up in my bathroom. The enlarger is on top of a kitchen trolley bought at Home Depot and modified to roll over the toilet in the bathroom. I use a tray rack that lets me stack three trays on top of each other to save counter space. I also have an old 8x10 print washer for washing fibre prints (my preferred material is Ilford Multigrade FB). The challenge in my situation is that the bathroom gets hot very quickly and sadly the ventilation fan is very noisy. I am considering replacing it with something much quieter, but proper ventilation is key. I have not been printing a lot recently, but the recent purchase of a 5x7 camera is going to allow me to contact print, which I find very exciting.

What's your process? Tell us a bit about your developing routine, especially if it's tricky.
I process roll film using the Paterson tanks. They use a little more chemistry, but I find the reels much easier to load (but they must be really dry) than the stainless steel systems. Sheet film is processed using Jobo drums. My preferred developers have been Ilfotech HC and Kodak D76. They give different looks but I find both pleasant. I have also used pyrogallol developers for landscape photos but understand the Pyrocat is a superior alternative to PMK. My developing routine is extremely repeatable. For roll film tanks, I agitate for the first 30 seconds of the first minute and for 10 seconds at every minute thereafter. Sheet films are processed in drums on constantly rotating roller bases. Developing times shift around based on how contrasty the situation is or if I am looking for extra “pop” in terms of contrast. It is valuable to test your film and developer combinations but too much testing takes away from taking pictures. I don’t really use the Zone System, but I try to understand the effects of the variables in the process. Henry Horenstien’s “Beyond Basic Black and White Photography” is an excellent book for folks who want to go further.
What's your all time favorite Film/Film developer combo?
Right now, I really enjoy Acros 100 in Ilfotech. It provides sharp, punchy images and the grain is minimal. HP5 in D76 is a real smooth combination. It’s a good general purpose combination that yields easily printed results. For longer scale scenes, the staining developers with pyrogallol are great for the separation of highlights and provides a lot of subtle gradation. I used to use it with TMX 100 (which would blow out highlights pretty easily) shot at 50 ISO.
Have you tried any or are you into any alternative processes, such as cyanotype?
I’m a bit of a nut for the alt processes and have printed both cyanotypes and platinotypes. I have done a workshop in carbon printing, but don’t have the space for the process at home. I recently completed a wet plate workshop and found the process to be fascinating and worth the effort.
The 5x7 camera I plan to be working with was bought to encourage me to work with the alt processes. The negative size is, in my opinion, the smallest that is comfortable for viewing as an image on a wall, or in a portfolio. The result of all this is that I am starting to look for a space to set up a dedicated darkroom where I can work with chemistry without wrecking my apartment (silver nitrate stains are the mark of the wet plate photographer).
What is the best processing tip you can give?
My best advice for new darkroom people is to be consistent. Make as much of it as repeatable as possible. When you want to make a change, change one thing at a time. Otherwise, you will never understand how you got something. I also feel that you should go out and shoot rather than chase magic bullets in the darkroom. Only optimize your processing to the point that you can see a difference in your prints. Though I enjoy the darkroom, I prefer to photograph.
Here are a few samples of Doug's work.


What is your darkroom? A room, closet or bathroom? Please tell us a bit about it.
I have a Saunders LPL 6x7 Dichroic Enlarger that I set up in my bathroom. The enlarger is on top of a kitchen trolley bought at Home Depot and modified to roll over the toilet in the bathroom. I use a tray rack that lets me stack three trays on top of each other to save counter space. I also have an old 8x10 print washer for washing fibre prints (my preferred material is Ilford Multigrade FB). The challenge in my situation is that the bathroom gets hot very quickly and sadly the ventilation fan is very noisy. I am considering replacing it with something much quieter, but proper ventilation is key. I have not been printing a lot recently, but the recent purchase of a 5x7 camera is going to allow me to contact print, which I find very exciting.
What's your process? Tell us a bit about your developing routine, especially if it's tricky.
I process roll film using the Paterson tanks. They use a little more chemistry, but I find the reels much easier to load (but they must be really dry) than the stainless steel systems. Sheet film is processed using Jobo drums. My preferred developers have been Ilfotech HC and Kodak D76. They give different looks but I find both pleasant. I have also used pyrogallol developers for landscape photos but understand the Pyrocat is a superior alternative to PMK. My developing routine is extremely repeatable. For roll film tanks, I agitate for the first 30 seconds of the first minute and for 10 seconds at every minute thereafter. Sheet films are processed in drums on constantly rotating roller bases. Developing times shift around based on how contrasty the situation is or if I am looking for extra “pop” in terms of contrast. It is valuable to test your film and developer combinations but too much testing takes away from taking pictures. I don’t really use the Zone System, but I try to understand the effects of the variables in the process. Henry Horenstien’s “Beyond Basic Black and White Photography” is an excellent book for folks who want to go further.
What's your all time favorite Film/Film developer combo?
Right now, I really enjoy Acros 100 in Ilfotech. It provides sharp, punchy images and the grain is minimal. HP5 in D76 is a real smooth combination. It’s a good general purpose combination that yields easily printed results. For longer scale scenes, the staining developers with pyrogallol are great for the separation of highlights and provides a lot of subtle gradation. I used to use it with TMX 100 (which would blow out highlights pretty easily) shot at 50 ISO.
Have you tried any or are you into any alternative processes, such as cyanotype?
I’m a bit of a nut for the alt processes and have printed both cyanotypes and platinotypes. I have done a workshop in carbon printing, but don’t have the space for the process at home. I recently completed a wet plate workshop and found the process to be fascinating and worth the effort.
The 5x7 camera I plan to be working with was bought to encourage me to work with the alt processes. The negative size is, in my opinion, the smallest that is comfortable for viewing as an image on a wall, or in a portfolio. The result of all this is that I am starting to look for a space to set up a dedicated darkroom where I can work with chemistry without wrecking my apartment (silver nitrate stains are the mark of the wet plate photographer).
What is the best processing tip you can give?
My best advice for new darkroom people is to be consistent. Make as much of it as repeatable as possible. When you want to make a change, change one thing at a time. Otherwise, you will never understand how you got something. I also feel that you should go out and shoot rather than chase magic bullets in the darkroom. Only optimize your processing to the point that you can see a difference in your prints. Though I enjoy the darkroom, I prefer to photograph.
Here are a few samples of Doug's work.
Monday, January 19, 2015
Red Light in a Dark Room - Part 8
This week we start you off with a look into Spencer's darkroom set up, where he mainly processes C41. Thanks for sharing your insightful notes and ideas with us, Spencer. Not to mention the photos! It's nice to actually see your set up.
What is your darkroom? A room, closet or bathroom? Please tell us a bit about it.
I develop my photos in the bathroom of my basement studio apartment. There’s not a lot of space, but that doesn’t really matter since I’m not printing or really doing anything except the actual development of my film. I usually try to warn people who come over for the first time so that they don’t freak out when they see all of the chemical containers and beakers, etc. lying all around my bathroom.

What's your process? Tell us a bit about your developing routine, especially if it's tricky.
I load my film onto reels to go into a 1L Paterson tank after the sun’s gone down, so I don’t have to worry as much about ambient light sneaking in. I fill my bathtub with water at the required temperature to pre-heat the chemicals and then get going. I find that the water temperature from the bath tap is much easier to control than from the sink tap. I’ve started putting down an old shower curtain on the ground to keep spills from leaving residue on the tile floor. I recently bought the Massive Dev Chart Timer app for my phone, which reminds me when to agitate the tank and when to go on to the next stage. It’s great for someone like me, who tends to space out a lot and forget an agitation cycle or take too long to move along to the next step of the process. I have paperclips hanging by string from the bar that holds my shower curtain, which I use to hang my film up to dry. I reuse my chemistry until it expires, then I take it to a pro lab for them to properly dispose of. I scan my negs at school with their Epson v500.


What's your go to developer?
I primarily shoot colour film and develop it in Tetenal’s C-41 chemistry. I used to use the Arista kit, but I find that I’m getting much better results from the Tetenal. They also have a 5L kit for a reasonable price, which I use and would recommend to save some money. For the B&W that I do, I’ve mostly been using X-Tol, but I recently bought some Blazinal (Rodinal) that I’m eager to try out.
What's your all time favorite Film/Film developer combo?
One of the nice (or not nice, depending on your point of view) aspects of C-41 is that it’s a standardized process that works the same with all film, which means that I can develop 100iso Ektar with 400iso Portra in the same batch without any problems, for example. I shoot a lot of Kodak Ektar and develop it in my Tetenal C-41 developer, so I’ll call that my favourite.
What result/look does this give?
Colourful!
Have you tried any or are you into any alternative processes, such as cyanotype?
C-41 seems to be a crazy alternative process to some people, but I don’t think that’s the case anymore. I have a book somewhere that my grandparents gave me, which outlines the twenty-something steps of developing colour film. I think that’s why my Dad, who got me into photography, and my teacher at Emily Carr, who got me back into film photography and developing, both politely tried to dissuade me from trying to develop my own colour film. After completely ignoring them, I found that it isn’t really any harder than developing black and white film. I guess photographic technology has advanced and been simplified since the 50s? Two summers ago, I was in a camera store in Toronto and asked the guy where their C-41 stuff was, since I couldn’t find it with their B&W chemistry. He seemed to think that that was the craziest question he had ever heard, saying that no one does C-41 anymore and then went back to his conversation with another customer about how great shooting with a Holga on expired film is. We should all appreciate how much better Beau is.
Outside of that, I’ve been meaning to make a batch of caffenol and try that out. I haven’t been able to find washing soda, which doesn’t seem to be as commonly available here as it is in Europe and the UK, where a lot of the articles on caffenol are written. I might be completely missing it, though, so please let me know.
What is the best processing tip you can give?
Developing your own colour film isn’t that scary! Seriously! Next time you’re in the store, I’m sure Nicole will be happy to tell you how generally clueless and inept I am (she might also be able to give you more useful information like where the Tetenal kit is and what the best containers to use are (accordions)). That should be proof that anyone can do it. I believe in you.
On a more technical level, make sure to pre-heat your developer to the temperature you want for at least 5 minutes before you actually start developing. Not doing this was the main reason I wasn’t getting good results when I started out. One of the biggest differences between B&W and colour development is that colour is (usually) developed at a much higher temperature for a relatively short period of time. I develop at 100º F, starting at 3:30, then increasing :15 for each time I reuse the chemicals. It’s important to get your developer up to that temperature before you start developing or else you’ll end up with a lot of underdeveloped photos. Also start running the water for the rinse stage before you finish with the Blix, so that it has time to warm up to the required temperature. Make sure to keep a log of your development times and results so that you can tweak your process from what the instructions say to what actually works for you. I also recommend using demineralized water rather than tap water.
Here are a few samples of Spencer's shots, straight after developing and not retouched.
You can see more of Spencer's work on his blog at: http://megamonkees.tumblr.com


What is your darkroom? A room, closet or bathroom? Please tell us a bit about it.
I develop my photos in the bathroom of my basement studio apartment. There’s not a lot of space, but that doesn’t really matter since I’m not printing or really doing anything except the actual development of my film. I usually try to warn people who come over for the first time so that they don’t freak out when they see all of the chemical containers and beakers, etc. lying all around my bathroom.
What's your process? Tell us a bit about your developing routine, especially if it's tricky.
I load my film onto reels to go into a 1L Paterson tank after the sun’s gone down, so I don’t have to worry as much about ambient light sneaking in. I fill my bathtub with water at the required temperature to pre-heat the chemicals and then get going. I find that the water temperature from the bath tap is much easier to control than from the sink tap. I’ve started putting down an old shower curtain on the ground to keep spills from leaving residue on the tile floor. I recently bought the Massive Dev Chart Timer app for my phone, which reminds me when to agitate the tank and when to go on to the next stage. It’s great for someone like me, who tends to space out a lot and forget an agitation cycle or take too long to move along to the next step of the process. I have paperclips hanging by string from the bar that holds my shower curtain, which I use to hang my film up to dry. I reuse my chemistry until it expires, then I take it to a pro lab for them to properly dispose of. I scan my negs at school with their Epson v500.
What's your go to developer?
I primarily shoot colour film and develop it in Tetenal’s C-41 chemistry. I used to use the Arista kit, but I find that I’m getting much better results from the Tetenal. They also have a 5L kit for a reasonable price, which I use and would recommend to save some money. For the B&W that I do, I’ve mostly been using X-Tol, but I recently bought some Blazinal (Rodinal) that I’m eager to try out.
What's your all time favorite Film/Film developer combo?
One of the nice (or not nice, depending on your point of view) aspects of C-41 is that it’s a standardized process that works the same with all film, which means that I can develop 100iso Ektar with 400iso Portra in the same batch without any problems, for example. I shoot a lot of Kodak Ektar and develop it in my Tetenal C-41 developer, so I’ll call that my favourite.
What result/look does this give?
Colourful!
Have you tried any or are you into any alternative processes, such as cyanotype?
C-41 seems to be a crazy alternative process to some people, but I don’t think that’s the case anymore. I have a book somewhere that my grandparents gave me, which outlines the twenty-something steps of developing colour film. I think that’s why my Dad, who got me into photography, and my teacher at Emily Carr, who got me back into film photography and developing, both politely tried to dissuade me from trying to develop my own colour film. After completely ignoring them, I found that it isn’t really any harder than developing black and white film. I guess photographic technology has advanced and been simplified since the 50s? Two summers ago, I was in a camera store in Toronto and asked the guy where their C-41 stuff was, since I couldn’t find it with their B&W chemistry. He seemed to think that that was the craziest question he had ever heard, saying that no one does C-41 anymore and then went back to his conversation with another customer about how great shooting with a Holga on expired film is. We should all appreciate how much better Beau is.
Outside of that, I’ve been meaning to make a batch of caffenol and try that out. I haven’t been able to find washing soda, which doesn’t seem to be as commonly available here as it is in Europe and the UK, where a lot of the articles on caffenol are written. I might be completely missing it, though, so please let me know.
What is the best processing tip you can give?
Developing your own colour film isn’t that scary! Seriously! Next time you’re in the store, I’m sure Nicole will be happy to tell you how generally clueless and inept I am (she might also be able to give you more useful information like where the Tetenal kit is and what the best containers to use are (accordions)). That should be proof that anyone can do it. I believe in you.
On a more technical level, make sure to pre-heat your developer to the temperature you want for at least 5 minutes before you actually start developing. Not doing this was the main reason I wasn’t getting good results when I started out. One of the biggest differences between B&W and colour development is that colour is (usually) developed at a much higher temperature for a relatively short period of time. I develop at 100º F, starting at 3:30, then increasing :15 for each time I reuse the chemicals. It’s important to get your developer up to that temperature before you start developing or else you’ll end up with a lot of underdeveloped photos. Also start running the water for the rinse stage before you finish with the Blix, so that it has time to warm up to the required temperature. Make sure to keep a log of your development times and results so that you can tweak your process from what the instructions say to what actually works for you. I also recommend using demineralized water rather than tap water.
Here are a few samples of Spencer's shots, straight after developing and not retouched.
You can see more of Spencer's work on his blog at: http://megamonkees.tumblr.com
Friday, January 16, 2015
E6 Film Processing
If you are having trouble finding a place to do your E6 film processing one of our regular customers, John, has a great home dark room set up (see our very first Red Light in a Dark Room series post!) and can process your E6 film for you! John is very meticulous and does a great job.
For his rates and info see his Craigslist posting here:
http://vancouver.craigslist.ca/bnc/pho/4849922917.html
And to read more about his dark room set up on our blog post here:
http://beauphoto.blogspot.ca/2014/12/red-light-in-dark-room-part-1.html
Photo: John Brunstein. Fuji Provia
For his rates and info see his Craigslist posting here:
http://vancouver.craigslist.ca/bnc/pho/4849922917.html
And to read more about his dark room set up on our blog post here:
http://beauphoto.blogspot.ca/2014/12/red-light-in-dark-room-part-1.html
Photo: John Brunstein. Fuji Provia

Monday, January 12, 2015
Red Light in a Dark Room - Part 7
This week's darkroom post is care of Kevin, who also does some printing in his home darkroom. Thanks for the great details, Kevin!
What is your darkroom? A room, closet or bathroom? Please tell us a bit about it.
My darkroom is my 800 square foot apartment's only bathroom, because Vancouver. I'm a member of the West End Photographic Society, and as such can use their darkroom in the West End, but I live in South Burnaby so the occasional hassle of monopolizing the bathroom is kind of fun. It does mean that I can only really print when my girlfriend isn't home for a long stretch of time, but anyways...
The enlarger sits on the floor, a couple of trays are in the tub, and one is next to the enlarger. I process one print at a time due to space requirements. I have a home-built print washer that I can set up elsewhere to do hour-long plus archival washing for FB prints, or if I'm really excited, I could get some Ilford Washaid to make it quicker.
In short, it's fun. I'm working with some colleagues who may wish to re-start a darkroom co-op, so if you are someone who has space that we could rent for an affordable rate, or wish to learn more, Nicole at Beau could probably put you in touch with me. (She sure can! Email film@beauphoto.com if you are interested.)
What's your process? Tell us a bit about your developing routine, especially if it's tricky.
Developing is both a lot of fun and the bane of my existence. For colour, I ship it all out to the Lab because I'm so terrified of temperature control it's not even funny.
For B&W, I tend to use trendy experimental methods I find online. I haven't done a Caffenol-C experiment yet (soon, soon), but for a while I was doing extremely dilute HC-110 stand development. I started getting edge density issues, so I've changed to a fancy combination of Rodinal and HC-110 (the so-called Rodin110) which is 4ml of Rodinal and 1ml of HC-110. Developing time is 30mins for any film, and any ISO at box speed. 30 seconds initial agitation, followed by 3 inversions at 10, 20, and 25 minutes. I have had no significant issues with this method, though I haven't tried to push it, yet.
What's your go to developer?
For the longest time, it was HC-110. Now, it's Rodinal/HC-110 combined. I'm enlarging up to 11x14 at home with a 6x7 negative, so I haven't had massive grain issues at all.
What's your all time favorite Film/Film developer combo?
Oh, I'm so split right now. I was, until very recently, all about Acros 100 in HC-110. Smooth, smooth, smooth. Acros is still my heartfelt favourite film, and I'll curse Fuji the day they discontinue it, which is why they never will, I'm sure.
As of late, however, I've had exceptionally good luck with Shanghai GP3 film. Clear base, seems to have nice tonality. I haven't run into the same problems others have had with it (backing numbers chemically etched into the emulsion).
What result/look does this give?
The Acros/HC-110 combo has been beautiful tonal gradation. That continues with the Rodin110. Shanghai GP3 has been interesting because it's been tonally great lately, too.
Have you or are you into any alternative processes, such as cyanotype?
I've a 4x5 camera that I really want to do wet plate photography with. I'm tempted by emulsion lifts, or homemade paper negatives. I've never done any of this, sadly.
What I have experimented with is stand development. It's great for low-contrast, compensating developing. However, I had some real problems with edge density, due to lack of agitation. I've got a happy medium at the moment with Rodin110 and regular agitation.
What is the best processing tip you can give?
Don't underestimate the importance of agitation for not ruining your prints.
What is your darkroom? A room, closet or bathroom? Please tell us a bit about it.
My darkroom is my 800 square foot apartment's only bathroom, because Vancouver. I'm a member of the West End Photographic Society, and as such can use their darkroom in the West End, but I live in South Burnaby so the occasional hassle of monopolizing the bathroom is kind of fun. It does mean that I can only really print when my girlfriend isn't home for a long stretch of time, but anyways...
The enlarger sits on the floor, a couple of trays are in the tub, and one is next to the enlarger. I process one print at a time due to space requirements. I have a home-built print washer that I can set up elsewhere to do hour-long plus archival washing for FB prints, or if I'm really excited, I could get some Ilford Washaid to make it quicker.
In short, it's fun. I'm working with some colleagues who may wish to re-start a darkroom co-op, so if you are someone who has space that we could rent for an affordable rate, or wish to learn more, Nicole at Beau could probably put you in touch with me. (She sure can! Email film@beauphoto.com if you are interested.)
What's your process? Tell us a bit about your developing routine, especially if it's tricky.
Developing is both a lot of fun and the bane of my existence. For colour, I ship it all out to the Lab because I'm so terrified of temperature control it's not even funny.
For B&W, I tend to use trendy experimental methods I find online. I haven't done a Caffenol-C experiment yet (soon, soon), but for a while I was doing extremely dilute HC-110 stand development. I started getting edge density issues, so I've changed to a fancy combination of Rodinal and HC-110 (the so-called Rodin110) which is 4ml of Rodinal and 1ml of HC-110. Developing time is 30mins for any film, and any ISO at box speed. 30 seconds initial agitation, followed by 3 inversions at 10, 20, and 25 minutes. I have had no significant issues with this method, though I haven't tried to push it, yet.
What's your go to developer?
For the longest time, it was HC-110. Now, it's Rodinal/HC-110 combined. I'm enlarging up to 11x14 at home with a 6x7 negative, so I haven't had massive grain issues at all.
What's your all time favorite Film/Film developer combo?
Oh, I'm so split right now. I was, until very recently, all about Acros 100 in HC-110. Smooth, smooth, smooth. Acros is still my heartfelt favourite film, and I'll curse Fuji the day they discontinue it, which is why they never will, I'm sure.
As of late, however, I've had exceptionally good luck with Shanghai GP3 film. Clear base, seems to have nice tonality. I haven't run into the same problems others have had with it (backing numbers chemically etched into the emulsion).
What result/look does this give?
The Acros/HC-110 combo has been beautiful tonal gradation. That continues with the Rodin110. Shanghai GP3 has been interesting because it's been tonally great lately, too.
Have you or are you into any alternative processes, such as cyanotype?
I've a 4x5 camera that I really want to do wet plate photography with. I'm tempted by emulsion lifts, or homemade paper negatives. I've never done any of this, sadly.
What I have experimented with is stand development. It's great for low-contrast, compensating developing. However, I had some real problems with edge density, due to lack of agitation. I've got a happy medium at the moment with Rodin110 and regular agitation.
What is the best processing tip you can give?
Don't underestimate the importance of agitation for not ruining your prints.
Tuesday, January 6, 2015
Learn to develop your own black & white film!

Have you ever wanted to learn how to process your own film at home but you aren't sure how to get started?
Well you are in luck! Beau Photo's own Kathy Kinakin will now be holding Black & White Film Developing classes, by appointment only. Schedule a time that suits you, for just $45 and receive a complete 90 - 120 min tutorial. (Please note; price change due to class time being extended to give everyone more time to practice film loading and ask lots questions!) Kathy will go through loading your film in the tank, and all the chemical processes needed to develop your black and white film at home!
The only required items for this course is your own developing tank and a roll of black and white film that is ready to be processed.
Please email the film department for more information or to schedule a time. film@beauphoto.com
Monday, January 5, 2015
Red Light in a Dark Room - Part 6
This week we hear from Zach on what he has in his dark room set up. Thanks for taking part, Zach! You can see some of what Zach has shot and processed on his Flickr page here: www.flickr.com/morrent
What is your darkroom? A room, closet or bathroom? Please tell us a bit about it.
It's a washroom. Not much added save a sign outside saying "light tight; no entry."
What's your process? Tell us a bit about your developing routine, especially if it's tricky.
I use Rodinal, so it's more a matter of math and timing. I sometimes use C-41 and Rodinal, so there's a good bit of guesswork involved.
What is your all time favorite Film/Film developer combo?
PanF+ and Rodinal. Figures right? Such a super power duo.
What result/look does this give?
Soft haloing, really unique grain structure and perfect mid-tones. Nothing quite like it.
Have you or are you into any alternative processes, such as cyanotype?
Plenty. Dabbled in plenty, nothing fancy though.
What is the best processing tip you can give?
Always be prepared to make mistakes, and to use them as reference.
Friday, January 2, 2015
Friday Featured Film Spotlight - Kodak T-MAX
This week Nicole talks a bit about her experience with Kodak TMAX 100 & TMAX 400 black and white films.
 For the longest time my fellow film fanatics would tell me how amazing Kodak's TMAX TMX100 & TMAX TMY400 film is, and for the longest time for my personal work I didn’t totally agree. I found my work lacked contrast when I shot with TMAX. On paper its characteristics read as follows: extremely fine grain, good tonal range and Tabular grain structure for super sharpness, all good attributes. But I was not really seeing these results when I shot the film, even in different situations. I shot other films as well in the same types of situations, so I knew it wasn't in how I was shooting the film.
However, I soon realized my dissatisfaction with TMAX film was perhaps because I’d only ever had it processed in Kodak XTOL. Perhaps that wasn't the right film and developer combination for me. I decided to load a roll of TMX100 in my Pentacon Six and have it processed in Blazinal/Rodinal. Much to my delight I found the Blazinal gave it the contrast I like my film to have while keeping the finer grain look that the TMAX is known for. This is why it is always a good idea to try out different combinations of films with different developers. You might think you don't actually like a certain film, but it may be more in the way it reacts with certain developers than the film itself. If you don't develop film yourself, it is a good idea to ask the lab you are having it done at which developer they use so you can keep track. It's not that easy to find labs to develop film these days, but it is an interesting experiment to take the same type of film to two different labs, using different developers, and see what it looks like!
If you have tried T-MAX in different developers and have found a noticeable difference, we'd love to hear about it! You can leave a comment below, find us on Twitter @beauphotostore or mention it on our Facebook. https://www.facebook.com/beauphotosupplies
Here are a few shots I took with the TMAX 100 developed in Blazinal.


However, I soon realized my dissatisfaction with TMAX film was perhaps because I’d only ever had it processed in Kodak XTOL. Perhaps that wasn't the right film and developer combination for me. I decided to load a roll of TMX100 in my Pentacon Six and have it processed in Blazinal/Rodinal. Much to my delight I found the Blazinal gave it the contrast I like my film to have while keeping the finer grain look that the TMAX is known for. This is why it is always a good idea to try out different combinations of films with different developers. You might think you don't actually like a certain film, but it may be more in the way it reacts with certain developers than the film itself. If you don't develop film yourself, it is a good idea to ask the lab you are having it done at which developer they use so you can keep track. It's not that easy to find labs to develop film these days, but it is an interesting experiment to take the same type of film to two different labs, using different developers, and see what it looks like!
If you have tried T-MAX in different developers and have found a noticeable difference, we'd love to hear about it! You can leave a comment below, find us on Twitter @beauphotostore or mention it on our Facebook. https://www.facebook.com/beauphotosupplies
Here are a few shots I took with the TMAX 100 developed in Blazinal.

Monday, December 29, 2014
Red Light in a Darkroom - Part 5
Hope everyone enjoyed their Holidays this past week with family & friends.
Thank you to Vytas for sharing his darkroom setup with us this week.
What is your darkroom? A room, closet or bathroom? Please tell us a bit about it.
What's your process, talk a bit about your developing routine, if its tricky.
What result/look does this give?
I have been doing a lot of writing about photographers in the 1960s so I have acquired a taste for a less contrasty, but still a high resolution kind of look. I should also say that I use lenses from the 1960s like the Leica Elmar 50mm f2.8, the Canon 50mm f1.4, and the Canon 35mm f2.
Have you or are you into any alternative processes, such as cyanotype?
What is the best processing tip you can give?
Thank you to Vytas for sharing his darkroom setup with us this week.
What is your darkroom? A room, closet or bathroom? Please tell us a bit about it.
I use the UBC
Visual Arts darkroom. It is a fully equipped room with
sinks, drying cabinets, change rooms, and a separate
facility with enlargers for wet printing. I have a locker
where I keep all my own developing equipment and chemicals -
I don't trust the nasty shared student stuff.
What's your process, talk a bit about your developing routine, if its tricky.
Nothing very
tricky about my process, I usually try to wait until I have
a few rolls to develop at a time, but sometimes I am too
excited to wait and develop a single roll. I use Paterson
tanks for 35mm and 120, as well as a Mod54 for 4x5.
What's your go
to developer?
I have tried
a lot of developers and I am not sure that I have a go to
one, if I was pressed I would say Rodinol. I typically use
Rodinol for 120 and 4x5, X-tol for 35mm, and T-max developer
for night photos when I push HP5 or Delta 3200 to 3200 ASA.
What's your all time favorite
Film/Film developer combo?
This changes quite often, but
right now I would say T-max 100 or 400 and Xtol.
What result/look does this give?
I have been doing a lot of writing about photographers in the 1960s so I have acquired a taste for a less contrasty, but still a high resolution kind of look. I should also say that I use lenses from the 1960s like the Leica Elmar 50mm f2.8, the Canon 50mm f1.4, and the Canon 35mm f2.
Have you or are you into any alternative processes, such as cyanotype?
I just
started preparing to do some platinum/palladium prints.
What is the best processing tip you can give?
The best
advice I can give is to not trust anything that you read on
the internet when it comes to developing. There are so many
'experts' that sound to convincing, but actually know
nothing. You have to try things for yourself and physically
see the results in order to make decisions. It's more fun
that way too.
Subscribe to:
Posts (Atom)